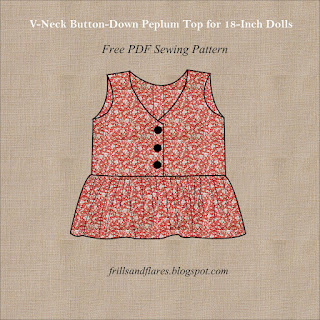
This V-neck button-down peplum top is a perfect addition for your doll's summer wardrobe. It has a opening at the front, where you can attach buttons and sew buttonholes, or you can attach Velcro or press studs inside and sew buttons on the outside for style purpose.
The top has an opening at the back where you can attach closures like Velcro or press studs.
Check out my other free 18-inch doll cloth PDF sewing patterns and tutorials:
Gathered Skirt with Elastic Waist for 18-Inch Dolls---Free PDF Sewing Pattern
Swirl Skirt with Elasticated Waist---Free PDF Printable Sewing Pattern for 18-Inch Dolls
Elastic Waist 8-Gore Skirt Pattern for 18-Inch Dolls
Reversible A-Line Dress for 18-Inch Dolls---Free PDF Sewing Pattern
Tiered Dress for 18-Inch Dolls ---Free Sewing Pattern
Tie-Front Top for 18-Inch Dolls---Free PDF Sewing Pattern and Sewing Tutorial
Peplum Top with Back Closure for 18-Inch Dolls---Free PDF Sewing Pattern
Surplice Peplum Top for 18-Inch Dolls---Free PDF Sewing Pattern
Click the link below to browse all the free PDF sewing patterns for women:
Here’s a step-by-step tutorial to sewing a V-neck button-down peplum top for an 18-inch doll.
Materials Needed:
- Lightweight cotton, linen, or knit fabric (fat quarter size is enough)
- Sewing Pattern (Free pattern link is given below)
- Matching thread
- Small buttons or snaps for closure
- Sewing machine or hand-sewing needle
- Fabric scissors
- Pins or clips
- Iron
- Optional: Interfacing for button placket
Step 1: Download the Free Sewing Pattern
Free PDF Sewing Pattern for V-Neck Button-Down Peplum Top for 18-Inch Dolls
How to print and assemble the pattern pages?
Click here to learn how to print and assemble the PDF pattern pages.
Step 2: Cut the Fabric
Cut the following pieces:
- Bodice Front (2 pieces) – includes button placket and V-neck
- Bodice Back (2 pieces)
- Peplum Front (1 piece on fold)
- Peplum Back (2 pieces)
- Neck Facing (2 front pieces, 1 back piece on fold)
Step 3: Prepare the Bodice
-
Sew the Shoulder Seams:
- Place front bodice pieces right sides together with the back bodice at the shoulders.
- Sew using a ¼-inch seam allowance and press open.
Fold the center front edges of the bodice 1/4 inch to the wrong side. Then fold the placket extension to the right side of the bodice.
-
Attach the Facing:
- Place the front and back facing pieces right sides together and join the shoulder seams.
- Place the facing on the neck line right sides together and pin.
- Sew around the V-neckline using a ¼-inch seam allowance.
- Flip the facing and placket inside and press well. Topstitch if desired.
Step 4: Sew the Buttons onto the Placket
-
Mark buttonholes (or snaps) and sew them in place.
Step 5: Finish the Armholes and Sew the Side Seams
Finish the Armholes: Use bias tape to cover the raw edge the armhole.
- Place front and back bodice pieces right sides together.
- Sew the side seams and finish the raw edges.
Finish the Armholes: Use bias tape to cover the raw edge the armhole.
Step 6: Attach the Peplum
-
Sew the Side Seams:
- Place front and back peplum pieces right sides together.
- Sew the side seams and finish the raw edges.
Hem the Peplum:
- Fold the bottom edge ¼ inch twice and sew.
-
Gather the Peplum:
- Sew a long basting stitch along the top edge of the peplum.
- Gently pull the threads to gather it until it matches the bodice width.
-
Attach Peplum to Bodice:
- Pin the peplum to the bodice, right sides together.
- Sew using a ¼-inch seam allowance and finish the raw edge with a serger or zigzag stitch.
Final Touches:
- Press all seams for a neat look.
- Topstitch around the neckline or placket for durability.
Now your doll has a cute V-neck button-down peplum top!
I have posted lots of free PDF printable sewing patterns on this page on my blog. Browse through this page to find the patterns you are looking for. You can download and use them to make your own clothes.


1 comment:
Good article. Embroidery Digitizing Service Impessive.
Post a Comment