Some of you have been asking for a simple, reliable way to print and assemble the pattern pages, so today I’m sharing a step‑by‑step guide to walk you through the whole process. Whether you’re new to printable patterns or just want a quick refresher, this little tutorial will help you prepare your pages with confidence and ease.
I am explaining this process using the kids pajama pants free PDF sewing pattern provided here.
1. Download the and Print PDF pattern file.
Once you click the PDF pattern download link, you will be directed to the download page. Now, download and save the PDF pattern file in a folder in your computer, and then open the file from the folder. Open the file now, and click "File" on the menu bar and select the "Print" option (shortcut for this is Ctrl + P), a "Print Page Setup" window will pop up.
I have provided the screenshot of this "Print Page Setup" pop-up window.
In the pop-up window, select "Actual size". Select "Current page" under "Pages to Print".
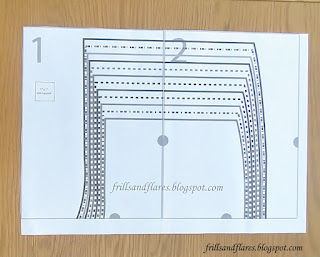
Print Page 1 (test page) first.
Measure the 1 inch by 1 inch box to check if your page has printed correctly.
You can print the pages in color, but for this demonstration, I’ve used grayscale to show that the pattern can still be assembled without color (if your printer prints only in black and white).
If the measurement is exactly 1 inch by 1 inch, then proceed to print the remaining pages. (When printing the other pages, make sure you set the page range to print, under "Pages to Print", so you don't have to print Page 1 again.) Else, check whether the settings in the "Print Page Setup" window are correct, and try printing again.
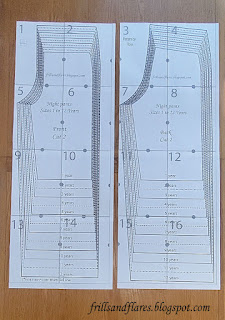
Once you have printed all the pages of the sewing pattern, arrange these pattern tiles as given in the pattern assembly. (I have provided the diagram of the pattern assembly in each post on my blog where I have posted the free PDF sewing patterns.)
For example, the pattern assembly diagram is given below.
We will arrange the pattern pages according to this.
Click the link below to browse all the free PDF sewing patterns for women:
Click the link below to browse all the free PDF sewing patterns for kids:
Click the link below to see the complete list of Free PDF Sewing Patterns for 18-Inch Dolls:
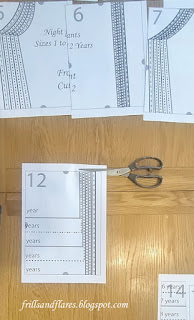
2. Trim the top and left edges of each page.
Trim the top and left edges of each page using scissors or a paper trimmer.
Let's take page 1.
This is how it looks after chopping off the top and left edges.
Repeat this process for all pages.
As an example, I’ll demonstrate it clearly with Page 12.
Snip off the top edge.
Snip off the left edge.
After you trim the edges off on all the pages, assemble the pages as per the pattern assembly diagram.
3. Tape or paste the pages together.
Refer to the pattern assembly diagram and align the left margin of Page 2 with the right margin of Page 1, and paste or tape them together. Complete the rows one by one. Once you have all the rows aligned, align the bottom margin of each row with the top margin of the previous row, and paste or tape them together.
We can see in the pattern assembly diagram of the Kids' Pants Pattern that the front and back of the pants pattern appear in sets of two pages.
The pants front pattern spreads across Pages 1 and 2, 5 and 6, 9 and 10, and 13 and 14.
The pants back pattern spreads across Pages 3 and 4, 7 and 8, 11 and 12, and 15 and 16.
Keeping that in mind, we will first make the front pattern ready, by joining together two pages in each row, as shown in the image below.
First align the left margin of Page 2 with the right margin of Page 1, and paste or tape them together.
Then Pages 5 and 6 together.
And then, Pages 9 and 10, and lastly, Pages 13 and 14.
Now that we have all the rows aligned, let's align the bottom margin of each row with the top margin of the previous row, and paste or tape them together.
Repeat the same steps with the next sets of pages for the pants back pattern.
4. Trace the pattern using tracing paper.
Now your pattern is ready to be traced. It is better to trace the pattern than to cut the pattern out, to save yourself the time and the hassle of printing, trimming, and pasting the pages again for each size. Also when you trace you can adjust the pattern or blend between the sizes, if your waist or hip size differs from the pattern size you have selected according to your bust size.
Place the tracing paper on your pattern.
Trace around the size you have selected.
Here, I’m tracing the size 9 pattern for my daughter. She’s a bit taller than average for her age, so I’ve increased the length by following the hemline of size 10.
Here are our traced out pants front and back pattern templates.
You can now place the pattern templates on the fabric, trace around them, cut the pieces out, and begin sewing.
Two pants front pattern pieces cut out from the fabric.
And two pants back pattern pieces cut out from the fabric.
For your convenience, I’ve organized my blog posts into the following sections. I hope you find this helpful!
These links appear at the top of my blog on the navigation bar as well.
Happy sewing!


