I apologize for the delay in posting the draft for the sleeves. Here the tutorial continues:
Step 13: The sleeve I used in this dress is a set-in puffed sleeve with fullness only at the sleeve hemline (no fullness at the sleeve cap, i.e., the top edge of the sleeve.). You may need a basic sleeve pattern to understand the drafting of puffed sleeve.
Click the link below to browse all the free PDF sewing patterns for women:
Click the link below to browse all the free PDF sewing patterns for kids:
Click the link below to see the complete list of Free PDF Sewing Patterns for 18-Inch Dolls:
Basic sleeve draft:
A to E = E to B = 1/8 chest + 2.5 inches
Draw a vertical line from E which meets the line CD at point F such that C to F = F to D = 1/8 chest + 2.5 inches
A to H = B to G = 1/8 chest
S to F = F to T = half sleeve round at hemline + 0.25 to 0.50 inch ease
E to I = E to M = 1 inch
Sleeve front curve:
Join G and I.
G to K = 1.5 inches
Join K and I.
J is the midpoint of GI. Mark L 0.5 inch from J.
Shape the front armhole GLE as shown in the figure.
Sleeve back curve:
Join H and M.
N is the midpoint of HM.
P is the midpoint of HN.
O is the midpoint of NM.
Mark Q 0.5 inch from N and mark R 0.5 inch from O.
Shape the back armhole HPQRM as shown in the figure.
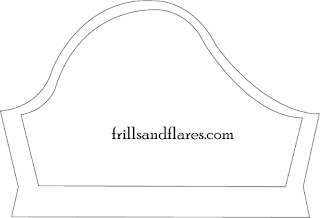
Your basic sleeve pattern will look like this once cut out:
Add seam allowances on all the sides---0.25 inch at the sleeve cap, 0.5 inch on the sides, and 1.5 inches at the hemline to fold and hem.
Pattern draft for puffed sleeve with fullness at hemline:
Make the following changes to the basic sleeve draft without seam allowances.
Extend the center line from F. Mark X 2 inches from F.
Mark U and V 0.75 inch from S and T, respectively.
Draw lines from X to both sides such that they pass through U and V. Refer to the figure.
Mark Y and Z 1 inch (you can increase this measure according to the fullness you prefer) from U and V, respectively.
Draw lines from H and G that pass through Y and Z, respectively.
Measure the distance from H to U as well as from G to V.
Use this measure to mark I and J.
Connect IXJ using a curved line.
This is how your puffed sleeve will look like:
Add seam allowances on all the sides---0.25 inch at the sleeve cap, 0.5 inch on the sides, and 0.25 inch at the hemline if you attach a sleeve band, 1 inch otherwise to fold and hem.
There is also another method called the "slash and spread method" to draft a puffed sleeve, which I will discuss in a later post.
Sleeve band:
A to B = C to D = Sleeve round + 0.25 to 0.5 inch ease + 1 inch for seam allowance on the sides.
A to C = B to D = width of the band = 1.5 inches (with 0.25-inch seam and hem allowances included. You can increase or decrease the width of the band, but it should not be less than 0.75 inch.)
Draft for the Bow at the Front:
Ribbon:
Bow center piece:
I have posted lots of free PDF printable sewing patterns on this page on my blog. Browse through this page to find the patterns you are looking for. You can download and use them to make your own clothes.
You can also click the Free Sewing Patterns Page at the top of this blog page (under the blog title) to find more free sewing patterns.
Click the below links to browse through all the pattern drafting and sewing tutorials on my blog.
Happy Sewing!
---Flora


