Search This Blog

Translate

Tuesday, September 12, 2023

How to Draft a Mandarin Collar Pattern?


What is a Mandarin collar?

Mandarin collar (also known as stand collar) is a close-fitting collar that stands upward from the neckline. The opening for this collar is usually kept at the front.


Measurements needed to draft the collar:

1. Total neckline measurement

2. Neckline measurement from center back to shoulder point at the neck

3. Neckline measurement from center front to shoulder point at the neck


How to draft the Mandarin collar?


A to B = Half of the total neckline measurement

A to C = 1.5 inches (height of the collar, i.e., collar width. This can be increased or decreased as per your preference. But 1.5 inches [3.81 cm] is the standard width.)

B to D is same as A to C.

D to C is same as A to B.

A to E is the neckline measurement from center back to shoulder point at the neck.

Square up 0.50 inch (1.27 cm) from B. Mark and label F. 

Draw a curved line from F to E.

Now AEF is the base of the collar (that is, the neckline edge of the collar).

Mark G such that DG = 0.25 inch (0.635 cm).

Square 1.5 inches from F that passes through G. 

F to G = A to C = 1.5 inches

Draw a line from H to C, parallel to AEF. 

HC is the top edge of the collar. 


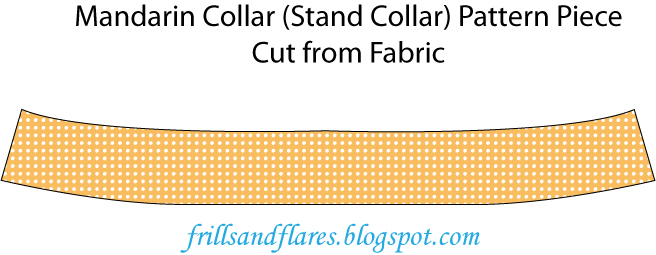
This is the pattern piece:


This is how the collar is cut from a folded fabric. The fold is on the center back line.


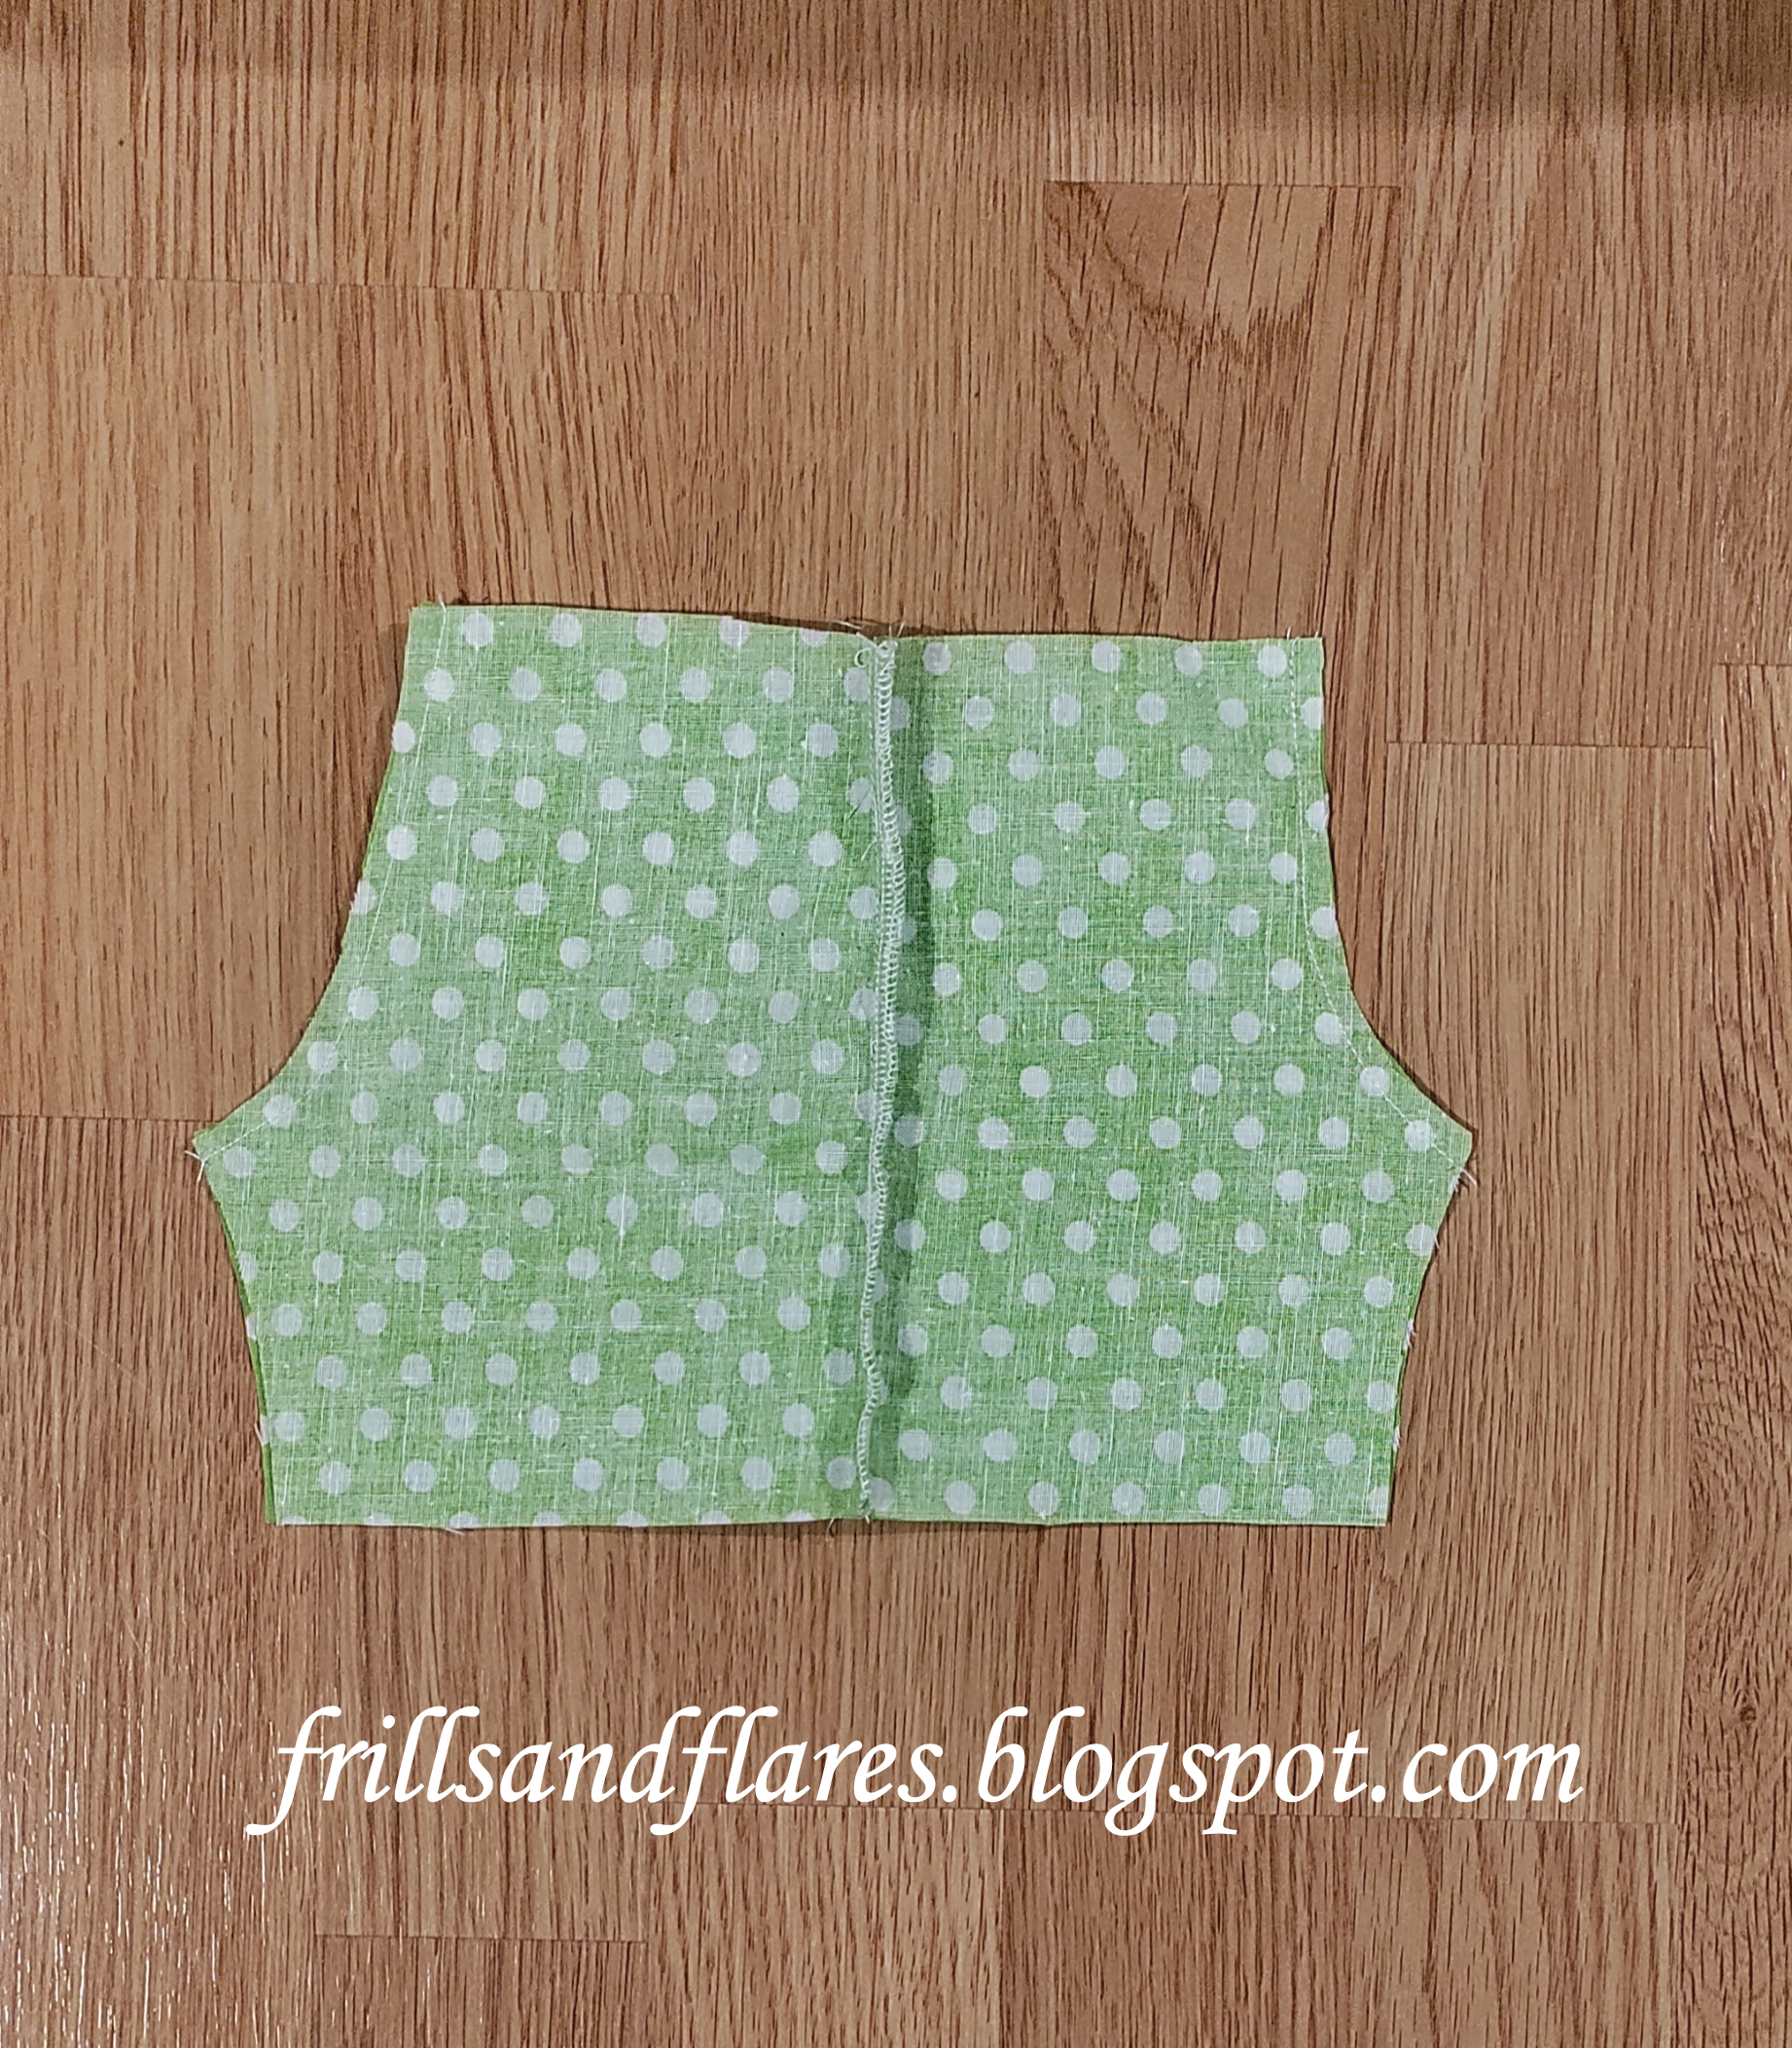
This is how the collar looks after it is cut from the fabric. Cut two collar pieces from the main fabric and one collar piece from fusible interfacing. Fusible interfacing is added for stability.


Add 0.375 (3/8) inch (1 cm) seam allowance all around the collar pattern.


We can also change the collar to have a curved corner as below.


Click here to see the step-by-step tutorial on how to attach the Mandarin collar to the neckline of a dress.

Happy Sewing!

---Flora


Monday, September 11, 2023

Full Circle Skirt Free PDF Printable Sewing Pattern for 18-Inch Dolls


Here's another PDF printable sewing pattern for an 18-inch doll---Full circle skirt with elasticated waist band.


Seam allowances:

Seam allowances are included in the pattern, which is for the skirt 0.25 inch at the top edge and 0.50 inch at the hemline, and for the waist band, 0.25 at the side seams, 0.25 inch at the top edge, and 0.25 inch at the bottom edge.


How to print?

This is a two-page PDF file. 

Print the page on an A4 paper. Make sure you have set page sizing to "Actual size" before you print the pattern. 

You can measure the 1 inch x 1 inch square in the pattern page to check whether the page has printed correctly.


Pattern Link:

Note: I recently found out that I had uploaded a wrong PDF file. I have removed the file and uploaded the new file. Please click the link below to download the new correct file. I apologize for the inconvenience.


How to Cut the Pattern Pieces from the Fabric?

This is how you will cut the skirt and waist band from the fabric. Cut the waist band  separately, and insert a 10-inch elastic into the waist band casing.


Suggested fabrics and fabric measurements:

An 18 x 18-inch (45 x 45-cm) fabric is needed to make this circle skirt. This is how the circle skirt will look like after it's cut out from the fabric. It will look like a donut. :-)


You can use a variety of fabrics to make this skirt, such as quilting cotton, gingham, linen, seersucker, crepe, silk, etc. 


How to Sew?

Hem the skirt. Fold the hemline towards the wrong side by 0.25 inch and then again by 0.25 inch and sew along the folded edge. 

Join the sides of the waist band with a 0.25-inch seam allowance. Fold the top edge of the waist band to the wrong side by 0.25 inch and then fold the bottom edge to the wrong side by 0.25 inch. Fold the waist band in half (it should be 0.50 inch wide now) and sandwich the 0.25 seam allowance of the top edge of the skirt into bottom edge of the folded waist band and pin all around. Sew along the inside folded edge of the waist band, while catching the skirt's seam allowance and the outside folded edge of the waist band along, leaving a 2-inch gap to insert the elastic. Next, insert a 3/8-inch-wide, 10-inch-long elastic, join the ends of the elastic by 0.25 inch, and then sew the opening closed. 


Now your doll has got a beautiful swirly circle skirt.


I have posted lots of free PDF printable sewing patterns on this page on my blog. Browse through this page to find the patterns you are looking for. You can download and use them to make your own clothes.


You can also click the Free Sewing Patterns Page at the top of this blog page (under the blog title) to find more free sewing patterns.

Click the below links to browse through all the pattern drafting and sewing tutorials on my blog.


These links appear at the top of my blog on the navigation bar as well.

Happy sewing!  


---Flora


Friday, September 8, 2023

How to Sew Bermuda Shorts for an 18-Inch Doll? (Sewing Tutorial + Free PDF Printable Sewing Pattern)


Today I would like to guide you through the step-by-step sewing tutorial for the free Bermuda shorts PDF sewing pattern for 18-inch dolls I posted here.


Materials needed:


3. Elastic (width 3/8 inch, length 10 inches)

4. Scissors

5. Sewing machine

6. Matching thread

7. Measuring tape

8. Serger (optional)


How to cut the pattern pieces?

Print out the pattern on an A4 paper and cut out your pattern pieces.


Here's how you cut out the pattern pieces from the fabric.

Place your shorts back pattern on the fabric and cut for the left side.


Flip the paper pattern on the fabric and cut for the right side.


Repeat this step for the front of the shorts as well.

Lay out the shorts front and back pattern pieces cut from the fabric like this:


Flip the front left and with right sides facing each other, place it over the back left. Similarly, flip the front right with right sides facing each other, and place it over the back right, as shown in the picture below. 


How to sew the shorts?

Let's start sewing.

Step 1: Join the sides.

With the right sides of the front and back fabric pieces (both the left and right) facing each other, join the sides of the shorts (with a 0.25-inch seam allowance). Finish the seam edges with a serger, or clip the seam edges with pinking shears.

You can also finish the seam edges before joining the pieces, and after joining, open the seams and press them... Whichever way you prefer.


Step 2: Join the crotch seams.

After joining the side seams, place the fabric pieces like so, with right sides facing each other.

Make sure you align the front pieces together (the seam line shown in blue in the image) and the back pieces together (the seam line shown in red in the image). Now sew over these seam lines (with a 0.25-inch seam allowance). These are called the center seams or crotch seams. Stop at the bottom of the crotch seams and leave the leg seam open.


Step 3: Join the leg seams.

Pin the the leg seams together and sew (with a 0.25-inch seam allowance) as shown in the image below.


Step 4: Hem the bottom edge of each leg of the shorts.

Fold the right leg hemline 0.25 inch inward and press.


Then fold again 0.5 inch inward and press. 


Sew along the folded edge. Repeat the same steps for the left leg.


Step 5: Create a casing at the waistline and insert the elastic.

Fold the waistline down by 0.25 inch and again by 0.50 inch.


Sew along the folded edge leaving a 2-inch gap to insert the elastic.


Take a 3/8-inch-wide, 10-inch-long elastic.


Insert the elastic through the casing using a safety pin, Overlap the edges by 0.25 inch, and secure the ends of the elastic by running zig-zag stitches over it a few times. Then, sew the 2-inch gap closed.

Turn the shorts inside out.

Now you have made a beautiful pair of shorts for your little girl's doll.


I have posted lots of free PDF printable sewing patterns on this page on my blog. Browse through this page to find the patterns you are looking for. You can download and use them to make your own clothes.


You can also click the Free Sewing Patterns Page at the top of this blog page (under the blog title) to find more free sewing patterns.

Click the below links to browse through all the pattern drafting and sewing tutorials on my blog.


These links appear at the top of my blog on the navigation bar as well.

These links appear at the top of my blog as well.

Happy sewing!  

---Flora


Thursday, September 7, 2023

How to Sew a Cute A-Line Skirt for an 18-Inch Doll? (Free PDF Printable Sewing Pattern Included)


Download and print the free A-line skirt for 18-inch doll PDF sewing pattern provided at this link.


Cut the pattern out.


Cut the pattern pieces:


Cut two pieces for the skirt on a folded fabric as shown in the image below, one for the front and one for the back.


Let's start sewing:

Join the sides:

With right sides facing, join the sides of the skirt.


Serge or zigzag the edges of the side seams, or trim the edges using pinking shears.


Hem the bottom of the skirt:


First, fold the hemline 0.25 inch to the wrong side and press well.


Again make a 0.50-inch fold, press well, and sew.


This is how the skirt looks when you turn it inside out.


Elastic waist:

Fold the waistline of the skirt 0.25 inch to the wrong side and press well.


Again make a 0.50-inch fold, leaving a 2-inch opening to insert the elastic.


Feed the elastic through the opening (length of the elastic = waist measurement minus 1 inch).


Overlap the ends of the elastic by 0.25 inch and sew a zigzag stitch over the overlap to secure it.


Sew the opening closed, turn the skirt inside out, and that's it, you have made a cute A-line skirt for your doll.


For your easy reference, I have organized my blog posts under the following sections. Hope it's useful to you:


These links appear at the top of my blog as well.

Happy sewing!  

---Flora