Search This Blog

Translate

Monday, January 22, 2024

Free Sewing Pattern---Kids' Sleeveless Reversible Bolero Vest---Size 2 years

I have posted a free printable sewing pattern today for a sleeveless reversible bolero vest for kids' size 2 years.


Click the link below to browse all the free PDF sewing patterns for women:


Click the link below to browse all the free PDF sewing patterns for kids:


Click the link below to see the complete list of Free PDF Sewing Patterns for 18-Inch Dolls:


Measurement Chart:

This is the measurement chart I used to create this vest pattern. It has bust sizes from for sizes 1 to 12 years. This vest is a for 2-year-old child. Please measure your child's bust round measurement and decide the size accordingly.


Seam and hem allowances:

A seam and hem allowance of 3/8 inch has been included in the pattern.


How to Print and Assemble the PDF Pattern Pages:


There are 2 pages in the sewing pattern, which are numbered 1 and 2 in bold gray-colored numbers at the center of the pages.

Print the pages on A4 papers. Make sure you have set "Page sizing" to "Actual size" and "Choose paper size by PDF page size" unchecked, before you print the pattern. 

You can measure the 1 inch x 1 inch square in pattern page 1 to check whether the page has printed correctly.


Pattern download link:

Click this link to download the pattern.


I will soon post the sewing tutorial for this vest and provide the link here.

Click this link to download the free reversible vest PDF sewing pattern for sizes 1 year to 12 years.

Click this link to download the free reversible vest with curved front PDF sewing pattern for sizes 1 year to 12 years.


I have posted lots of free PDF printable sewing patterns on this page on my blog. Browse through this page to find the patterns you are looking for. You can download and use them to make your own clothes.

You can also click the Free Sewing Patterns Page at the top of this blog page (under the blog title) to find more free sewing patterns.

Click the links below to browse through all the pattern drafting and sewing tutorials on my blog.


Happy sewing!

---Flora


Thursday, December 7, 2023

A-Line Skirt with Elasticated Waist---Free PDF Printable Sewing Pattern for 12-Inch Dolls

Here is a free PDF printable pattern for making an A-line skirt with elasticated waist for 12-inch dolls.


Click the link below to browse all the free PDF sewing patterns for women:


Click the link below to browse all the free PDF sewing patterns for kids:


Click the link below to see the complete list of Free PDF Sewing Patterns for 18-Inch Dolls:


Seam allowances are included in the pattern itself and have been mentioned in the pattern page.


Download link:

Click here to download the pattern.


How to print?


Print the page on an A4 paper. Make sure you have set page sizing to "Actual size" before you print the pattern. 

You can measure the 1 inch x 1 inch square in the pattern page to check whether the page has printed correctly.


How to sew?

Step 1: Join the sides of the skirt front and back pieces with a 1/4 inch seam allowance. 

Step 2: Finish the hemline by folding down the hemline by 1/4 inch and then by 1/4 inch again and sew over the folded edge.

Step 3: Join the sides of the waistband using a 1/4 seam allowance.

Step 4: Fold down the top edge of the waist band by 1/4 inch, and then, with the right sides facing, join the bottom edge of the waistband with the skirt's top edge using a 1/4 inch seam allowance.

Step 5: Fold the waistband in half, and sew over the folded edge leaving a small gap to feed the elastic in. Insert a 0.25-inch-wide, 3.5-inch-long elastic through the casing, and overlap the ends of the elastic by 0.25 inch and sew them together. Sew the gap in the casing closed. That's it!


I have posted lots of free PDF printable sewing patterns on this page on my blog. Browse through this page to find the patterns you are looking for. You can download and use them to make your own clothes.

You can also click the Free Sewing Patterns Page at the top of this blog page (under the blog title) to find more free sewing patterns.

Click the links below to browse through all the pattern drafting and sewing tutorials on my blog.


Happy sewing!

---Flora


Monday, October 23, 2023

Kids' A-Line Jumper Dress Free PDF Printable Sewing Pattern---Size 1 Year

Today, I would like to share with you a free PDF printable sewing pattern---Kids' A-Line Jumper Dress with Straps at the Shoulder for Size 1 Year.


*Cut 2 of the yoke pieces from the main fabric on fold, and cut 2 of the yoke pieces from the lining fabric on fold. (So, in total cut 4 pieces). Please ignore the instruction in the pattern page for the yoke piece as I have not mentioned it clearly there.

This is a knee-length dress. You can shorten the skirt length in half to make a top instead of making a dress.

Click the link below to browse all the free PDF sewing patterns for women:


Click the link below to browse all the free PDF sewing patterns for kids:


Click the link below to see the complete list of Free PDF Sewing Patterns for 18-Inch Dolls:


How to Print and Assemble the PDF Pattern Pages:

There are 3 pages to print. Print the pages on A4 or US letter size papers. Make sure you have set page sizing to "Actual size" before you print the pattern. 

You can measure the 1 inch x 1 inch square in the pattern page to check whether the first page has printed correctly and then proceed to print the other pages.

Stick the page tiles together at the margins, using the numbers printed on each page.

This is how the pattern pages are assembled together. 


Here is the download link: Kids' A-Line Jumper Dress Free PDF Printable Sewing Pattern---Size 1 Year

Here is the link for the sewing tutorial: Kids' A-Line Jumper Dress Sewing Tutorial


Seam allowances:

Seam allowances are included in the pattern itself. Seam lines are shown with dashed lines.

Strap: 3/8 inch for the top and bottom edges and 3/8 inch for the center seam. 

Yoke: 3/8 inch for the top and bottom edges and the armhole, and 3/4 inch for the side seam.

Skirt: 3/8 inch for the top edge, 3/4 inch for the side seam and hem line.


Happy Sewing!

---Flora


Friday, October 20, 2023

Empire Waist Dress with Overlapping Front Bodice and Two Sleeve Variations---Free PDF Printable Sewing Pattern---Kids' Size 1 Year

I want to share with you all today the free PDF printable sewing pattern of an empire waist dress with overlapping front bodice and with two sleeve variations---a short sleeve and a puff sleeve---for girls' size 1 year. I have also included in the pattern a bow and a ribbon that can be attached to the front bodice to enhance the look of the dress.


Click the link below to browse all the free PDF sewing patterns for women:


Click the link below to browse all the free PDF sewing patterns for kids:


Click the link below to see the complete list of Free PDF Sewing Patterns for 18-Inch Dolls:


How to Print and Assemble the PDF Pattern Pages:

This is a 9-page PDF file.

Print the pages on A4 or US letter size papers. Make sure you have set page sizing to "Actual size" before you print the pattern. 

You can measure the 1 inch x 1 inch square in the pattern page to check whether the page has printed correctly.

Stick the page tiles together at the margins, using the numbers printed on each page.

This is how the pattern pages are assembled together. 


Seam and hem allowances:

*Seam and hem allowances are included in the pattern. 

Bodice front: neckline, shoulder, and armhole 3/8 inch, side seam 3/4 inch, bottom edge seam 1/2 inch

Bodice back: neckline, shoulder, and armhole 3/8 inch, side seam 3/4 inch, center back 1/4 inch, bottom edge seam 1/2 inch

Skirt front and back: top edge seam 1/2 inch, side seam 3/4 inch, hemline 1 1/4 inch

Short sleeve: sleeve cap 3/8 inch, side seam 1/2 inch, hemline 3/4 inch

Puff sleeve: sleeve cap 3/8 inch, side seam 1/2 inch, hemline 1/4 inch

Sleeve band: top edge and the bottom edge 1/4 inch, side seam 3/4 inch

Bow main piece: 1/4 inch on all the sides

Ribbon under the bow: 1/4 inch on all the sides

*Use the seam allowances mentioned here for this pattern.

There's only one change in the back pieces. We won't be attaching buttonhole and button extensions separately as shown in the sewing tutorial. Instead, I have extended the center back 1/2 inch to add in the buttons and buttonholes. When you join the main and lining back pieces, use an 1/4 inch seam allowance at the center back


Click this link to download the free PDF sewing pattern for the empire waist dress with overlapping front bodice---size 1 year.

Click this link for the sewing tutorial of this dress. 


I have posted lots of free PDF printable sewing patterns on this page on my blog. Browse through this page to find the patterns you are looking for. You can download and use them to make your own clothes.


You can also click the Free Sewing Patterns Page at the top of this blog page (under the blog title) to find more free sewing patterns.

Click the below links to browse through all the pattern drafting and sewing tutorials on my blog.


Happy Sewing!

---Flora


Saturday, October 14, 2023

How to Draft the Pattern for a Basic Dress with Gathered Skirt, In-Seam Pockets, and Cap Sleeves

I was planning to make a dress for my younger daughter. These are the sketches I did for the dress, with two sleeve variations: a cap sleeve and a long sleeve.


My daughter chose the first option with cap sleeves. She selected a vintage-style mint green floral fabric for the dress's skirt and a solid white fabric for the bodice and sleeves. 


This is the look we preferred.


While drafting the pattern I thought I must share the pattern drafting tutorial here on my blog. So today, let's learn how to draft a basic dress that has a gathered skirt with hidden in-seam pockets and cap sleeves.  


Click the link below to browse all the free PDF sewing patterns for women:


Click the link below to browse all the free PDF sewing patterns for kids:


Click the link below to see the complete list of Free PDF Sewing Patterns for 18-Inch Dolls:


We will break down the tutorial into four steps:

1. The basic bodice

2. The gathered skirt 

3. The in-seam pockets and

4. The cap sleeves


We will need the following measurements to draft the pattern for this dress:

1. Full length of the dress (from the highest point of the shoulder to the knee)

2. Bodice length (from the highest point of the shoulder to the waist)

3. Across shoulder measurement (from shoulder point to shoulder point)

4. Armhole depth

5. Bust round

6. Waist round

7. Front neck depth

8. Back neck depth

9. Neck width

10. Biceps round

11. Sleeve cap length 

12. Length of the cap sleeve (Usually lesser than the cap height)


1. The basic bodice

I have posted a detailed tutorial on how to draft kids' basic bodice on this page. Please check.

I have made some changes to the back bodice draft.

I wanted to add buttons and buttonholes at the center back.

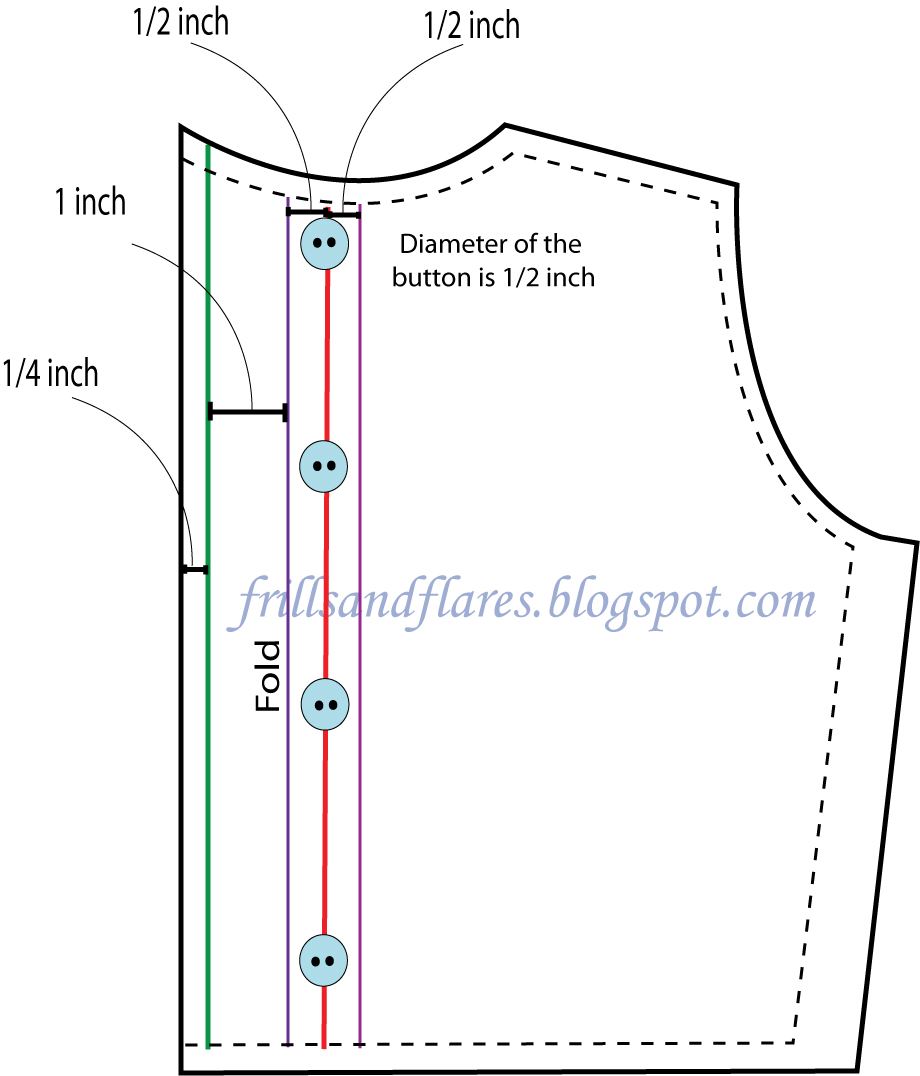
For this we need to extend the center back to accommodate for the button and buttonhole overlaps. We need to first determine the width of the button (diameter of the button) that we are going to sew on the center back line. (The red line in the picture below is the center back line.) I am planning to use 1/2-inch-wide buttons. So my button stand will extend 1/2 inch from the center back line. (Generally, a button stand is extended 3/4 inch from the center line. This is the standard width used in the garment industry. 

Here, the diameter of the button I want to use is 1/2 inch. Therefore I have extended the button stand 1/2 inch from the center back line. If we want to use a button with an 1 inch diameter, then we should extend the button stand 1 inch from the center line.)

I wanted to draft a self-faced button stand. Therefore, we will add another 1 inch to the width of the button stand. The green line indicates the added width that needs to be folded inside. We can either serge along the green line to conceal the raw edge, or we can add an extra 1/4 inch to fold and hide the raw edge. Here in this draft, I have added an extra 1/4 inch.

The outer purple line is where we will fold the button placket facing. 


2. The gathered skirt

Pattern draft:


A-B = full length of the dress minus the bodice length

A-C = bust round/2

C-D = A-B

B-D = A-C

D-E = 3/4 inch for kids and 1 inch for ladies

Connect E to B with a curved line.

C-F = 1 inch

Connect F and E with a straight line.

Add seam and hem allowances to the pattern:


I have added 3/8 inch to the waist, 3/4 inch to the sides, and 1 1/4 inch to the hemline.


3. The in-seam pockets

First, locate the best spot at the side seam of the skirt where you want to place the pocket. This can be 1.75 inch to 3 inch down from the waist seam. Mark this location with a small line. This is the start of the pocket's top edge.


Then, trace around the hand of the person for whom you are making the dress, with their fingers slightly stretched out. You can also trace a glove that matches their hand's size. 


Place the traced hand pattern on the skirt's side seam where you have marked for the pocket placement already.

Draw the pocket shape around this traced hand pattern.


Mark the end of the pocket's lower edge on the skirt's seam allowance. 


Add 1/4 inch seam allowance all around the pocket pattern. After adding the seam allowances, mark the top and lower edge of the pocket on the side seam of the skirt pattern template with small lines (notches). See the red lines in the image below.


Trace the pocket pattern out. You will have to cut two pocket pieces from the main fabric for the right side and then flip and cut another two for the left side. 


4. The cap sleeves

To know how to draft a cap sleeve pattern check this page.

If you want to have long sleeves instead of cap sleeves, please check this link for the pattern drafting tutorial.

These are the pattern pieces needed to make this dress. Seam allowances are shown with dashed lines.


I will soon post the free PDF sewing pattern and sewing tutorial of this dress. 

I have posted lots of free PDF printable sewing patterns on this page on my blog. Browse through this page to find the patterns you are looking for. You can download and use them to make your own clothes.


You can also click the Free Sewing Patterns Page link at the top of this blog page (under the blog title) to find more free sewing patterns.

Click the below links to browse through all the pattern drafting and sewing tutorials on my blog.


Happy Sewing!

---Flora


Thursday, October 12, 2023

How to Draft a Self-Faced Cap Sleeve Pattern?

Today, we will see how to draft a self-faced cap sleeve.

A cap sleeve is a short sleeve style that covers only the shoulder and a small part of the upper arm, providing minimal coverage. It typically creates a feminine silhouette and is often seen in tops and dresses.


Click the link below to browse all the free PDF sewing patterns for women:


Click the link below to browse all the free PDF sewing patterns for kids:


Click the link below to see the complete list of Free PDF Sewing Patterns for 18-Inch Dolls:


We will draft the cap sleeve using the basic sleeve pattern. 

I have posted a detailed tutorial on how to draft a basic long sleeve pattern here.

We need to make small changes to the cap part of the sleeve to get the cap sleeve pattern.

The cap sleeve we are going to draft is not joined at the side seams. It ends halfway on the armhole.

You will need these measurements to draft the sleeve:

1. The length you prefer for the cap sleeve (Usually lesser than the cap height.)

Pattern Draft:


ACB is the biceps line in the basic sleeve draft.

C is the midpoint of AB.

Mark D 1 to 1.5 inches from C.

Draw a the line FDE parallel to the biceps line ACB.

You can also mark D from the center notch of the sleeve F such that FD is the length of the sleeve you prefer.

Now, we will cut out the FDEG part from this draft, and this is going to be our cap sleeve pattern.


This pattern is cut from a folded fabric like this:


The fold at the bottom is the hemline of the sleeve. The upper curve is the sleeve cap that is to be joined to the bodice armhole. When we open the folded fabric it will be like this:


The cap sleeve pattern below the fold will be used for facing. Thus we have a self-faced cap sleeve.

Please check the dress with gathered skirt and inseam pocket tutorial where I have shown how to use the basic bodice block draft discussed earlier and the cap sleeve pattern draft discussed in this post.

I have posted lots of free PDF printable sewing patterns on this page on my blog. Browse through this page to find the patterns you are looking for. You can download and use them to make your own clothes.


You can also click the Free Sewing Patterns Page at the top of this blog page (under the blog title) to find more free sewing patterns.

Click the below links to browse through all the pattern drafting and sewing tutorials on my blog.


Happy sewing

---Flora