Search This Blog

Translate

Thursday, March 31, 2022

How to Draft a Summer Top with Yoke and Ruffled Sleeves

As summer is around the corner, today we will see how to easily draft a summer top with ruffled sleeves (frill sleeves) and a yoke style line at the front and back.

Front


Back


We will first draft this top using an A-line top pattern. Then at the chest we will add the yoke line which separates the top into two parts: a yoke part and a skirt part. We will then increase the skirt part's width to add some gathers so that we could change the top to a breezy summer top. This top can also be worn as a pajama top. As the last step, we will add ruffled sleeves to the top.

Pattern draft (both front and back draft are shown in the picture below):


[I have given the measurements in centimeters in boldface red-colored text for those who prefer using the metric system of measurements.]

Body measurements needed:

1. Full length of the top
2. Bust round
3. Shoulder width
4. Arm hole depth or scye depth
5. Front neck depth
6. Back neck depth


A to B = full length of the top, from shoulder point at neck to the desired length (the top length usually ends between the waist and hip.)

A to C = shoulder width/2

B to D = 1/4 bust + 2 inches for kids (4 inches for ladies) [1/4 chest + 5.08 cms for kids (10.16 cms for ladies)]

A to F = C to E = 1/4 bust - 1 (or) scye depth (both the measurements will be more or less the same). As this is a loose-fitting top worn in summer, you can lower down the armhole depth under the arms by 0.5 inch or 0.75 inch [1.27 cms to 1.905 cms], if you prefer.

F to G = 1/4 bust + 0.5 to 0.75 inch ease [1/4 chest + 1.27 cms to 1.905 cms ease]

C to H is 0.5 inch for kids and 1 inch for ladies [1.27 cms for kids and 2.54 cms for ladies].

A to I is 1/12 chest or as per your preference.

Join I with H.  IH is the shoulder slope.

Measure H to E. Mark a point L on HE which is half of the H to E measurement.

L to M = 0.5 inch [1.27 cms] for kids and 0.75 inch for ladies [1.905 cms].

Draw the front arm curve and back arm curve as shown in the picture.

Now we will draw the yoke style line. The yoke style line is usually drawn above the bust line. Here, we will calculate the depth of the yoke line A to N as three-fourth of the A to F measurement.

Draw the yoke style line from N, which touches the front arm curve at O and the back arm curve at P.

We will cut through the style line N-O to get the yoke part for the front and N-P to get the same for the back.

I wanted to add some gathers in the front and back skirt parts of the top for some fullness at the yoke line.  

For this, we need to increase the width of the skirt part of the top. So, we add N to Q = B to R =  3 to 5 inches [7.62 to 12.7 cms] (according to the fullness we would like to have at the yoke line).

A to J is back neck depth (usually 1 inch [2.54 cms]).

A to K is front neck depth (usually 1/12 chest + 0.5 inch [1/12 bust + 1.27 cms]).

Square down from C. Mark S where the squared line meets B to D. 

T to D is 0.5 inch for kids (0.75 inch for women).

Shape front and back necklines.

Join TSB with a curved line. This is the hemline.


Sleeve draft:


Now let's move onto the sleeve part. To draft the ruffled sleeve, you will have to measure the front and back arm curves, that is, the armhole measurement. For this, you need to arrange the front and back pieces of the basic A-line top as shown in the picture below.


Then, to add ruffles to the sleeve, you need to double or triple the armhole measurement, whichever you prefer. 

In the picture below, I have kept A to B two times the armhole measurement.


C is the center point of AB. Draw a perpendicular line from C and mark the sleeve width CD, which is usually 1 to 1.5 inches [2.54 to 3.81 cms]. We can increase the sleeve width according to our preference. Connect A-D-B. And our ruffled sleeve pattern is ready.

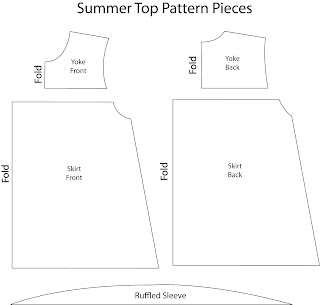
The image below shows the pattern pieces without seam allowances. 


We need to add seam allowances to these pattern pieces. 


Seam allowances for the front and back yoke:

0.375 inch at the neckline, yoke line, and armhole

Seam allowances for front and back skirt:

0.375 inch at the yoke line and armhole

0.75 inch at the side seam

1 inch at the hem line

Seam allowance for the ruffle sleeve:

0.375 inch at the armhole seam

0.50 inch at the hem line

We will cut the pieces on the fabric like this.


I have posted the sewing tutorial of the summer top here. 

I have posted lots of free PDF printable sewing patterns on this page on my blog. Browse through this page to find the patterns you are looking for. You can download and use them to make your own clothes.


You can also click the Free Sewing Patterns Page at the top of this blog page (under the blog title) to find more free sewing patterns.

Click the below links to browse through all the pattern drafting and sewing tutorials on my blog.


Happy sewing!

---Flora
 

---Flora


Tuesday, March 29, 2022

Women's Kurta (Kameez) Free Sewing Pattern---Sizes XS to XXL---for Bust Sizes 30, 32, 34, 36, 38, 40, 42, and 44

I have been working on this kurta (kameez) pattern for a while, and finally it's ready to be posted today. I am so excited to share this pattern with you all.


Image source: Google Images


This is a semi-fitted straight kurta with side slits from the hipline. I have used the standard measurements to make this pattern.

You can increase or decrease the length of the kurta and the length of the sleeve as per your wish. You can also change the front neck depth, add a little flare from the hipline to the bottom hemline and close the side slit, or make a 4-inch slit at the center back from the neckline and finish it with a button and elastic loop closure, if you prefer to do so.

You can also use this pattern to make a shift dress.

There are totally 49 pages. Print the pattern on A4-sized papers.

Select "Actual size" when you print the pages.


How to Print and Assemble the PDF Pattern Pages:


The pattern assembly is given below.  


The pattern download link is HERE. 

Note: Seam allowances are included in the pattern. 

Given below are the details of the seam allowances included in the pattern:

Kurta front and back pieces:

For neckline, shoulders, and sleeve cap, seam allowance is 0.375 inch.

For side seams: 1 inch

Hemline: 1.5 inches

Sleeve:

For sleeve cap: 0.375 inch

For side seams: 1 inch

Sleeve hemline: 1.5 inches


Please check this link on my blog if you want to learn how to draft a kurta or kameez: Kameez pattern draft


I have posted lots of free PDF printable sewing patterns on this page on my blog. Browse through this page to find the patterns you are looking for. You can download and use them to make your own clothes.


You can also click the Free Sewing Patterns Page at the top of this blog page (under the blog title) to find more free sewing patterns.

Click the below links to browse through all the pattern drafting and sewing tutorials on my blog.


Happy sewing!

---Flora


Tuesday, March 15, 2022

Free Sewing Pattern---Women's Kurta (or Kameez) Size XS (Bust Size 30)

Recently I drafted the pattern for women's kameez (or kurta) in size XS (for a bust size of 30 inches). This is a medium-fit kameez.


Ease is included in the pattern, but seam allowances are not included. Please add seam allowances as given below.

Seam allowances to be added to the pattern: 

Around neck: 0.50 inch

Sleeve cap: 0.50 inch

Sleeve hemline: 1.5 inches

Shoulders: 0.50 inch

Side seam: 1 inch

Bottom hemline 2 inches


Body measurements used in this pattern:

Bust round: 30 inches

Waist round: 24 inches

Hip round: 34 inches


How to Print and Assemble the PDF Pattern Pages:


I have drawn a small line at the front side seam and back side seam in the pattern to indicate the starting point for sewing the side slit. 


I have numbered the pattern pages from 1 to 15. Assemble the A4 pattern pages as given in the picture below and you will get your pattern together:


Here is the link to download the pattern: Kameez (kurta) free pattern pdf.  

Please check this link if you want to learn how to draft a kurta or kameez: Kameez pattern draft

I will soon post the kurta pattern in other sizes too. 

Note: You can find the kurta pattern in all sizes from XS to XXL at this link.


I have posted lots of free PDF printable sewing patterns on this page on my blog. Browse through this page to find the patterns you are looking for. You can download and use them to make your own clothes.


You can also click the Free Sewing Patterns Page at the top of this blog page (under the blog title) to find more free sewing patterns.

Click the below links to browse through all the pattern drafting and sewing tutorials on my blog.


Happy sewing

---Flora


Monday, October 25, 2021

A-Line Dress with Peter Pan Collar Free Sewing Pattern for 18-Inch Dolls

Hi Everyone,

I am happy to share with you another new sewing pattern---A-line dress for 18-inch dolls with Peter Pan collar. Now you can make an A-line dress for your daughter's 18-inch doll to match with your daughter's A-line dress.


The measurements of the doll I used are

Chest 11.5 inches
Waist 11 inches
Hip 11.75 inches

This pattern will fit 18-inch dolls such as the American Girl® Doll and Our Generation® Doll and dolls with similar body measurements.

Here is the download link.


Pattern assembly is given below:


Seam allowances are included in the pattern. It is 1/2 inch for the sides, 1/4 inch for the armhole, neckline, and shoulders.

Hem allowance is 3/4 inch for the bottom hem fold.

Button extension is marked on the back pattern of the dress, which is 1-inch in width.

A 0.25 inch seam allowance is included for the collar piece.

I have used grey triangles on each page in the pattern to help you with matching the pages easily. 

You can find the sewing tutorial of the dress here

I have posted lots of free PDF printable sewing patterns on this page on my blog. Browse through this page to find the patterns you are looking for. You can download and use them to make your own clothes.


You can also click the Free Sewing Patterns Page at the top of this blog page (under the blog title) to find more free sewing patterns.

Click the below links to browse through all the pattern drafting and sewing tutorials on my blog.


Happy sewing!

---Flora


Sunday, October 17, 2021

Free PDF Sewing Pattern---Kids' Night Pants (Pajama Pants)---Size 11 years

I have uploaded a free sewing pattern for kids' size 11 years night pants with elasticated waist at this link.  Download the PDF pages and assemble the pages as shown in the picture below.

Cut 2 pieces each for front and back.

Seam allowances are already included in the pattern:

1.5 inches at the waist for casing for the elastic.

1.5 inches at the bottom for hem allowance.

0.50 inch for the side seam.

0.25 inch for the crotch seam and inseam.


I will try to post the pattern in other sizes too.

You can find lots of free PDF printable sewing patterns on this page on my blog. You can download and use them to create your own clothes.

You can also click the Free Sewing Patterns Page at the top of this blog page (under the blog title) to find more free sewing patterns.

Click the below links to browse through all the pattern drafting and sewing tutorials on my blog.


Happy sewing!


---Flora


Wednesday, October 6, 2021

How to attach an embroidered patchwork with uneven edges to the neckline of a dress or top?---Tutorial

I made a kurta (or kameez) for me few weeks before, and it had a separate decorative embroidered yoke that had a neckline with uneven edges and cutwork leaf designs on the edges, which had to be lined because of the heavy embroidery with silk and metallic threads.

I would like to share the method for lining this type of neckline with a short tutorial. 


Step 1:

First, pin the embroidered neckline piece and the kurta front fabric together (place the kurta fabric below and the embroidered neckline piece on top of it, with the right side of the embroidered neckline facing the wrong side of the kurta front fabric). Then stick them on a glass window using adhesive tapes as shown in the image below. (You can use a light box as well.)

Trace the shape of the neckline on the wrong side of the embroidered neckline piece with a pencil. The royal blue fabric in the image is the kurta front fabric and the white fabric is the embroidered yoke piece with uneven neckline edges.


Traced neckline:


Step 2:

Without taking the pins off,  sew over the traced shape of the neck line. I sewed it by hand as I found sewing it by hand was easier than doing it with a sewing machine, as it had many curvy edges and cutwork leaves. 


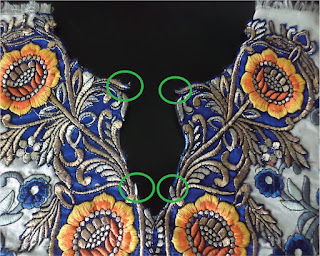
Make sure you don't stitch over the cutwork leaves (highlighted in the image below). Fold them away, so that you don't catch them with the needle, and carefully stitch under them.


Step 3:

Then, cut along the shape of the hand-sewn neckline leaving a 0.25 inch seam allowance all around the neckline.


Step 4:

Make small slits around the neckline to get crisp edges when you turn it inside out. Now, turn the neckline inside out. Push the edges down and press both the embroidered fabric and the kurta front fabric along the neckline to keep the uneven edges neat and beautiful. (Make sure to cover the embroidery with a cotton fabric before you press over it, so that the embroidery threads won't get spoiled.)


Voila! You have got a neat-looking embroidered neckline!

You can also follow these steps to line blouses and dresses with necklines that have silk thread Maggam embroidery or heavy metallic thread embroidery.

You can find lots of free PDF printable sewing patterns on this page on my blog.

You can also click the Free Sewing Patterns Page at the top of this blog page (under the blog title) to find more free sewing patterns.

Click the below links to browse through all the pattern drafting and sewing tutorials on my blog.


Happy sewing!


Sunday, October 3, 2021

Free Sewing Pattern---Women's Simple Top Size M

Today I want to share with you a simple top pattern in women's size M.


Here are the download links for the top's frontback, and sleeve.

Seam allowances are included in the pattern.

Side seam: 0.5 inch

Neck, shoulder, and sleeves: 0.375 inch

Cut the front and back on fold.

For your reference, below are the measurements I used to make the pattern. I have added an overall ease of 2 inches at the bust round. Preferable fabrics to make this top are woven fabrics such as cotton, linen, lawn cotton, poplin, etc.


Body measurements:

Shoulder width: 14 inches

Vertical measurements:

Full length of the top: 24 inches

Shoulder to Bust length: 10.5 inches

Shoulder to Waist length: 15 inches

Shoulder to Hip length: 23 inches

Round measurements:

Upper bust round: 35 inches

Bust round: 36 inches

Waist round: 29 inches

Hip round: 40 inches

Sleeve measurements:

Armhole round: 15 inches

Arm round: 13 inches

Sleeve length: 5 inches


Sewing instructions:

1. Join the shoulders.

2. Make a 4-inch slit at the center back down from the back neckline, and then attach a placket to conceal the raw edges of the opening.

3. Finish the neckline with bias tape.

4. Join the sides.

5. Attach the sleeves.

6. Finish the hemline.


You can find lots of free PDF printable sewing patterns on this page on my blog. You can download and use them to create your own clothes.

You can also click the Free Sewing Patterns Page at the top of this blog page (under the blog title) to find more free sewing patterns.

Click the below links to browse through all the pattern drafting and sewing tutorials on my blog.


Happy sewing!
Flora


Tuesday, September 21, 2021

Free Sewing Pattern---Bermuda Shorts - Girls' Sizes 6 to 12

Hi Friends, 

Here is another free sewing pattern---Girls' Bermuda shorts in sizes 6 to 12. 


Click this link to download the pattern. 


Size Chart:

This is the size chart I used. Measure your kid's hip round and compare the measurement with the hip measurement in the size chart to find the right size.


Seam allowances are already included in the pattern. I have mentioned it in the pattern itself.

You can shorten the length of the shorts at the hemline as per your preference.

This is how the pattern should be assembled:


For clarity, I have provided a pdf page as well to help you understand the pattern assembly and size key. Here is the link to the pdf page. Print the pattern pages on A4-sized papers. 

Here is the link to the sewing tutorial of the Bermuda shorts on my blog

Check this link if you are looking for free Bermuda shorts pattern for kids' sizes 1 to 5 years.

You can find lots of free PDF printable sewing patterns on this page on my blog. You can download and use them to create your own clothes.

You can also click the Free Sewing Patterns Page at the top of this blog page (under the blog title) to find more free sewing patterns.

Click the below links to browse through all the pattern drafting and sewing tutorials on my blog.


Happy sewing! 😊

---Flora


Sunday, September 12, 2021

How to Draft the Pattern for Bermuda Shorts?

Hi Friends,

Hope you all are keeping well and safe. After a long time away from blogging, I am back again with a  pattern draft for Bermuda Shorts. This draft can be used to make shorts of any length, as you can minimize the full length according to your preference.

You need only two measurements to draft this pattern:

1. Full length of the shorts (from waist to the desired length [usually a few inches above the knee])

2. Hip round

Shorts front pattern draft:

A to B = full length of the shorts from the waist.

A to C is the crotch depth measurement. You can calculate crotch depth by using this formula:  hip round/4 + 2 inches (You can add 0.5 or 1 inch for ease if you prefer.)

You can also take the crotch depth (or) body rise measurement on your body and add 0.5 or 1 inch for ease if you prefer.

Draw horizontal lines from A, B, and C.

C to E = hip round/4 + 1 inch (or 1.5 inches if you want more ease) (C to E is the crotch line)

A to D is same as C to E.

E to F = hip round/12

E to H = hip round/8

E to I = half of E to F + 0.25 inch 

Shape H-I-F as shown.

B to G = C to F minus 0.75 inches (B to G is the hemline)

Shape inside seam F-G.


Shorts back pattern draft:


Back pattern can be drafted by using the front pattern and then adding these extra measurements: 

F to J = 1.5 inches

F to K = 0.75 inches

Join K and D.

K to M is same as E to H which is 1/8 hip.

Shape J-M  as shown.

D to L = 0.75 inch

Join A and L.

G to N = 1.5 inches

Shape inside seam N-J.


Seam allowances:

Keep 1.5 inches at the waistline for the casing for the elastic .

Keep 1.5 inches at the bottom for hem.

Keep 0.5 inches at the side seams (if you prefer to have side seams).

Keep 0.5 at the fork and inseam.


You can find a free shorts pattern for kids' sizes 6 to 12 years at this link on my blog

You can find lots of free PDF printable sewing patterns on this page on my blog.

You can also click the Free Sewing Patterns Page at the top of this blog page (under the blog title) to find more free sewing patterns.

Click the below links to have a browse through the pattern drafting and sewing tutorials on my blog.


Sunday, February 7, 2016

Tutorial---How to Draft and Sew the Sailor Collar

Finally, as promised some time before, I am posting the tutorial for sailor collar today. I attached this collar to a popover A-line dress I made. I am extremely sorry for the delay. It took more time to make the tutorial and post it here than to actually sew the dress---taking the photographs, writing the step-by-step tutorial, uploading the photos in order, etc. Finally, am happy that it is out today.


Collar front:


Collar back:

Free Sailor Collar Sewing Pattern:

If you are looking for a free sailor collar sewing pattern, I have posted it here for kids' ages 1 year to 12 years. Do check it out.

If you want to make the collar on your own, please continue reading this drafting tutorial.

How to draft the sailor collar:

First, lay out the front and back of the dress pattern .


With the neckline of both the front and pieces touching each other, place the front bodice shoulder tip on the back bodice shoulder tip with an overlap of about 0.5 inch.


Trace the center front, the neckline, and center back. Mark the front bodice's shoulder tip on the paper.


Decide the front and back collar length and mark them on the paper. (I kept 4 inches at the front and 6 inches at the back for my four-year-old daughter.)

You can make sailor collar in different styles. For this type of sailor collar, I kept a deep front neck and then attached an one-side-open inset instead of drafting a button-down front.

 
Square a line from the point on the center back and draw the sailor collar connecting the points (as shown in the image below). Slightly curve the outside edges of the collar's front side.


Trace this to get the collar pattern piece.


Square a line 1.5 inches down from the center front. This is for drafting the inset piece.


Trace ABC to get the inset piece.


You will have to  change the front neckline of your dress or blouse to the shape of the collar. Place the collar over the front neckline as shown.


Trace along the neckline edge from the shoulder point at neck.


 Cut through this line. This will be your new front neckline.


Cut out the front and back of the dress.


Now you will have to draft the neck facings.

Back neck facing:

Place the tracing paper over the dress back pattern and trace as shown.


Cut it off. This is your back neck facing. (I copied it again on a white paper.)


Front neck facing:

Trace the front neck facing as shown.


Place the inset piece you drafted earlier as shown in the photo below.


Extend the top of the inset piece to include the front neck facing as in the photo below and trace all around.


The purpose of doing this is to set the width of the hidden part of the inset piece same as that of the facing, so that when we sew it together with the facing, the wrong side of the neck will also look neat.


How to cut the pattern pieces:

Add seam allowances (3/8 inch) to the pattern pieces.

Now, cut 2 collar pieces on fold. One for upper layer and the other for lower layer. (Sorry for the bad light that shows the white fabric yellowish.)


Cut two inset pieces on fold. One is main, and the other is lining.


Cut back neck facing on fold.


Cut front neck facing on fold.


How to make the sailor collar:

Sew in bias tape or satin ribbon in a contrast color (blue or red is usually used) as shown.
(Please use a lightweight fabric for bias tape. I made a big mistake of choosing a wrong fabric for the bias tape. It was heavier than the collar fabric. That's the reason for the puckering.)


With right sides facing, pin the outer edges of the two collar layers together, leaving out the neckline edge open.


Sew them together on the pinned edges with a seam allowance of 3/8 inch.


Trim the edges using pinking shears and clip the corners.


Turn the collar inside out. Using chopsticks or any other sharp tool, push the corners of the collar to make them nice and crisp, and also shape the edges. Press the collar with lot of steam.


Can you notice the markings on both sides of the collar? These were traced from the paper pattern earlier.


We will match these with the shoulder points when we attach it to the neckline of the dress .


How to make the inset:

First, sew in the same color bias tape or ribbon, which you used for the collar, on the right side of the main inset piece, 1/2 inch from the top edge.


With wrong sides facing together, join the the main piece and the lining piece on the sides, leaving the top edge open. (You can also leave one of the side edges open instead of the top edge, if you don't like stitches showing at the top.) Trim the edges of the sides.


Fold down 1/4 inch from the top.


Turn the inset inside out.


Sew close the opening (sorry, I didn't take a photo for this step).

How to attach the collar to the dress:

First, with right sides facing, pin and sew the shoulder seams of the dress.


Open the seams and press.


Pin the neck edge of the collar to the neckline of the dress.


Once you have positioned the collar well, sew all around.


Join the front and back neck facings.


Open the seams and press.


With the right sides of the collar and the facing touching, sew the facing all around the neck, matching the seams with seams at the shoulder. You can use fusible interfacing with the facing if you prefer.
 

Hem or serge the outer edge of the facing and trim the neckline with pinking shears.

  
Press the facing down the wrong side of the dress and understitch to keep the seam edges sharp and neat. There is a good tutorial for understitching here. (W
hile you understitch, be careful not to catch the collar on the outside [i.e., the right side]). On the right side of the neckline, our understitches will be hidden under the collar.


Hem the back neck facing if you prefer. I did it later.


Attaching the inset:

This step is optional. You can attach the inset or leave the collar as is. An inset is used to control the deep V-neck and adds style.


Attach one side of the inset to one side of the front facing to secure it, as shown below. Be careful not to catch the collar under while you attach the inset.


On the right side of the dress front, top stitch close to the collar as shown below.


Attach three small press studs (snap fasteners) on the inset like so.


Now make a bow and attach it at the bottom of the collar. You have finished making the sailor color!


You can find lots of free PDF printable sewing patterns on this page on my blog. You can download and use them to create your own clothes.

You can also click the Free Sewing Patterns Page at the top of this blog page (under the blog title) to find more free sewing patterns.

Click the below links to browse through all the pattern drafting and sewing tutorials on my blog.


Housewarming Gifts