Search This Blog

Translate

Sunday, February 19, 2012

How to Sew Empire Waist Dress with Overlapping Front Bodice


Step 1---Arranging the pattern pieces

Using the patterns for the dress's front, back, and sleeves, cut and arrange your pattern pieces.

You can see how to draft the front here.

Dress back draft is shown here.

Sleeve draft is discussed here.

Front bodice:

Two main fabric pieces and two lining fabric pieces.


Back bodice:

Two main fabric pieces, two lining fabric pieces. (The button and buttonhole extensions in the below image are of same size which I changed later. You can note the difference in the dimensions in image next to the image below.)


Button and buttonhole extensions. I kept the button extension wider than the buttonhole extension. The buttonhole extension will overlap the button extension.


Front skirt:

Back skirt:
Sleeves:


Sleeve bands:


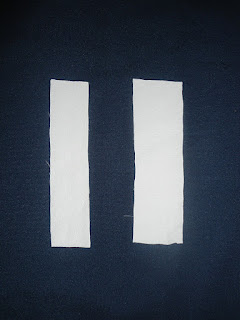
Bow, bow center, and bow ribbons:

For bow and bow ribbons, cut two pieces of fabric. Bow center is made with a single piece of fabric.


Step 2---Making the bodice and attaching the sleeves

With right sides facing, join the front and back bodice lining fabric pieces at the shoulders. For clarity, I have labeled the joined lining fabric pieces as A and B.


Next, with right sides facing, join the front and back bodice main fabric pieces at the shoulders. For clarity, I have labeled the joined main fabric pieces as C and D.


With right sides facing, pin together (only at the neckline) each set of lining fabric and main fabric bodice pieces (that is, A with C and B with D). In the image below, the lining fabric piece is on top and the main fabric piece is underneath.


Join the main fabric and lining fabric pieces together at the neckline, removing the pins as you join.


Clip the neckline edge as shown in the photograph below.


Turn the pieces inside out and press.


(Please excuse me for the brown stain you see on the bodice piece on the right side. It was made by my little artist. I should have been careful to keep the dress out of her reach. A lesson learned!)

Attaching the button and buttonhole extensions to the back bodice pieces:

We are going to attach the button extension to the left-side piece of the back bodice, and the buttonhole extension to the right-side piece of the back bodice. (You can also do this step before joining the lining and main bodice pieces.)

First we will attach the button extension. Pin the button extension with the lining side of the back bodice left piece at the center back. Also pin the main and lining fabric pieces at the waist seam and side seam (pointed by the arrows in the photo) to prevent the two pieces slipping away from each other.


Sew the button extension in place with a 0.25 seam allowance. You can notice in the image below that the button extension's length (according to the draft) is more than the center back length. We will trim this excess off in the next step.


You can trim off  the excess at the top according to the shape of the neckline not straight as shown here. I trimmed it later.


This will look like this on the main side.


Fold the button extension first by 0.25 inch and press, and then by 1 inch to cover the seam and pin.
 

I could not keep the fold as neat as I wanted it to be, because the fabric I used was too slippery and the pins could not hold the fabric in place (After a long try, I folded it somehow.)

Sew the edge of the fold in place. Your button extension will now extend 1 inch from the center back of the left piece. (You can also attach the button extension to the main side and fold it down the lining side.)


Now, we will attach the buttonhole extension to the center back of the right back piece.


Fold 0.25 inch first and fold again fully and sew the fold in place.


This will look like this on the main side.

We have finished the back bodice. This is the finished look.


Next, we will attach the sleeves.

Sew long stitches (basting stitches) 0.25 inch up from the hemline of the sleeve by setting the stitch length to the longest in your sewing machine (It is 4 in my machine). Leave 3 inches of thread on both sides.


Pull the threads to gather the sleeve hemline such that the length of the hemline equals the length of the sleeve band. With right sides facing, pin the sleeve hemline to the sleeve band with a 0.25 seam and then sew them together.


Pick out the gathering stitches (i.e., the basting stitches) at this step, and then fold the sleeve band to the wrong side and hem. Repeat the same for the other sleeve.


I kept the sleeves plain at the sleeve cap (that is, I did not gather the sleeve at the top edge). The sleeves have a puffed effect only at the hemline. The sleeve cap can be usually 1 to 1.5 inches more than the armhole. This extra measure is called sleeve cap ease. I read in some books that for puffed sleeves, cap ease can be reduced to 0.5 inch. For this, you need to slightly trim the cap in the basic sleeve draft before you will use it to draft the puffed sleeve or after you have drafted the puffed sleeve. I didn't do this, but it might have been easier to fit in the sleeve to the armhole if I had done it.

To even out the sleeve cap ease, or to set the sleeve into the armhole, sew two rows of long stitches close to the edge of the sleeve cap between the front and back notches and even out the fabric at the sleeve cap by lightly pulling the loose threads on both sides. Make sure you don't create gathers. The extra fabric should be eased into the cap evenly. 


With right sides facing, pin the sleeve to the armhole of the bodice.


Sew the sleeve in place.


Repeat the same for the other sleeve.
 
Sew the darts and your bodice is ready now.

Step 3---Sewing darts in the skirts

Sew the darts in the front and back skirts.


Step 4---Joining the bodices with the skirts

Before this step, pin the back bodice pieces at the bottom such that the buttonhole extension overlaps the button extension.

With right sides facing, join the back bodice and the back skirt on the wrong side at the empire line.


This will look like this on the right side.
 

With right sides facing, join the front bodice and the front skirt on the wrong side at the empire line. Before doing this, pin the front bodice pieces together at the bottom such that the right-side piece overlaps the left-side piece. You can see this in the previous image.


This will look like this on the right side.

Step 5---Joining the sides

Join the sides and hem the bottom of the dress. Your dress is almost done.


Step 6---Attaching the bow and ribbons

Now, you will need to attach the bow and ribbons. If you like the plain look of the dress, you can skip out this step.

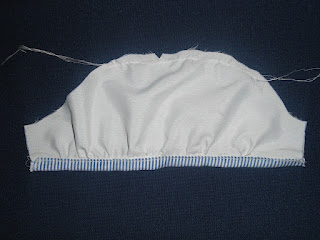
With right sides facing, join the two bow pieces with a 0.25 inch seam on all the sides leaving a little opening at the top to turn the bow inside out. I have indicated the opening in the image below.


Turn the bow inside out through the opening and whip stitch to close the opening.

With right sides facing join the two ribbon pieces with a 0.25 inch seam on all the sides leaving a little opening at the top to turn the bow inside out. I have indicated the opening in the image below.


Turn the bow inside out through the opening and whip stitch to close the opening.

Take the rectangular piece for the bow center. Make 0.25 inch folds breadthwise.


Then make 0.50 inch folds lengthwise.


Fold again and whip stitch to join the edges.


Bring the seam line to the center and press.


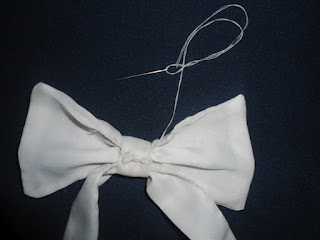
Arrange the bow and ribbon and wrap the bow center piece around the center as shown in the photo below.  Whip stitch to join the raw edges of the bow center piece. Do not cut the thread off, you can use it to attach the bow to the dress. I attached the bow to the dress where the front bodice overlap ends. There are also other methods to make the bow and ribbon. I will share them with you in my future projects.


Fix buttons and sew buttonholes, respectively on the button and buttonhole extensions in the back bodice, and your empire waist dress is ready to wear.


Some action shots:


I hope you enjoyed this tutorial. Please let me know your valuable comments, ideas, and suggestions.

I have linked this to the Sunday show off link party on Twigg Studios, the Sew Tuesday link party on Creative Itch, and the link party on Shwin&Shwin.

You can find lots of free PDF printable sewing patterns on this page on my blog. You can download and use them to create your own clothes.

You can also click the Free Sewing Patterns Page at the top of this blog page (under the blog title) to find more free sewing patterns.

Click the below links to browse through all the pattern drafting and sewing tutorials on my blog.


Friday, January 27, 2012

Pattern Draft---Empire Waist Dress Sleeves (Puffed Sleeves) and Bow


I apologize for the delay in posting the draft for the sleeves. Here the tutorial continues:

Step 13: The sleeve I used in this dress is a set-in puffed sleeve with fullness only at the sleeve hemline (no fullness at the sleeve cap, i.e., the top edge of the sleeve.). You may need a basic sleeve pattern to understand the drafting of puffed sleeve.

Basic sleeve draft:


A to E = E to B = 1/8 chest + 2.5 inches

Draw a vertical line from E which meets the line CD at point F such that C to F = F to D =  1/8 chest + 2.5 inches

A to H = B to G = 1/8 chest

S to F = F to T = half sleeve round at hemline + 0.25 to 0.50 inch ease

E to I = E to M = 1 inch

Sleeve front curve:

Join G and I.

G to K = 1.5 inches

Join K and I.

J is the midpoint of GI. Mark L 0.5 inch from J.

Shape the front armhole GLE as shown in the figure.

Sleeve back curve:

Join H and M.

N is the midpoint of HM.

P is the midpoint of HN.

O is the midpoint of NM.

Mark Q 0.5 inch from N and mark R 0.5 inch from O.

Shape the back armhole HPQRM as shown in the figure.

Your basic sleeve pattern will look like this once cut out:

Add seam allowances on all the sides---0.25 inch at the sleeve cap, 0.5 inch on the sides, and 1.5 inches at the hemline to fold and hem.


Pattern draft for puffed sleeve with fullness at hemline:

Make the following changes to the basic sleeve draft without seam allowances.


Extend the center line from F. Mark X 2 inches from F.

Mark U and V 0.75 inch from S and T, respectively.

Draw lines from X to both sides such that they pass through U and V. Refer to the figure. 


Mark Y and Z 1 inch (you can increase this measure according to the fullness you prefer) from U and V, respectively.

Draw lines from H and G that pass through Y and Z, respectively.

Measure the distance from H to U as well as from G to V.

Use this measure to mark I and J.

Connect IXJ using a curved line.

This is how your puffed sleeve will look like:

Add seam allowances on all the sides---0.25 inch at the sleeve cap, 0.5 inch on the sides, and 0.25 inch at the hemline if you attach a sleeve band, 1 inch otherwise to fold and hem.


There is also another method called the "slash and spread method" to draft a puffed sleeve, which I will discuss in a later post.

Sleeve band:


A to B = C to D = Sleeve round + 0.25 to 0.5 inch ease + 1 inch for seam allowance on the sides.

A to C = B to D = width of the band = 1.5 inches (with 0.25-inch seam and hem allowances included. You can increase or decrease the width of the band, but it should not be less than 0.75 inch.)

Draft for the Bow at the Front:


Ribbon:


Bow center piece:


I have posted lots of free PDF printable sewing patterns on this page on my blog. Browse through this page to find the patterns you are looking for. You can download and use them to make your own clothes.


You can also click the Free Sewing Patterns Page at the top of this blog page (under the blog title) to find more free sewing patterns.

Click the below links to browse through all the pattern drafting and sewing tutorials on my blog.


Happy Sewing!

---Flora


Tuesday, January 17, 2012

Pattern Draft---Empire Waist Dress Back


Step 8:


The pattern draft for the front part of the dress is over. Now we will draft the pattern for the back.


All the points are marked as in the front draft except a few points. A to F is the back neck depth which is as per your preference. I have marked it 1 inch.

Mark M 0.5 inch from L. Mark N 1 inch from I. Join G-M-N-I to shape the back armhole. Other measurements are same including the dart. Draw the empire line as you did for the front side.

Please include the dart intake as per your requirement. The dart intake I kept in this dress was 0.50 inch (this will be 0.75 inch or more for females above 14 years). 


Step 9:

Cut through the empire line to get the back bodice and skirt pieces.


Back Bodice:


The only change to the back bodice is to mark the new dart base point X. 


Step 10:

Unfold the back bodice draft and cut through the center back to separate right and left back pieces. Draw the seam allowances. It is 0.5 inch on all the sides except on the neckline and for joining the button and buttonhole closures, for which a 0.25 inch seam allowance is required. Extend the dart legs as shown in the figure.


I joined the button and buttonhole closures separately. They are drafted as follows:

The left one is for button closure.

A to B = C to D = Center back length + 1.5 inch (1 inch for fold at the neckline and 0.5 inch for the seam allowance for joining at the waistline.) 

A to C = B to D = 2.5 inches

The right one is for buttonhole closure.

E to F = G to H = Center back length + 1.5 inch (1 inch for fold at the neckline and 0.5 inch for the seam allowance for joining at the waistline.)

E to G = F to H =  1.5 inches

Step 11:


Back skirt:


Extend the dart legs as you did for the front skirt. Mark X 3/4 inch (can be 1inch for women's size) from Q and draw a curved line connecting B and X.

Step 12:

Add seam allowances---0.5 inch for waist and sides and 1.25 inch for hemline fold. Extend the dart legs upward.


Tomorrow I will show you how to draft the sleeves.

You can see how to draft the front here.

Sleeve draft is discussed here.

I have posted lots of free PDF printable sewing patterns on this page on my blog. Browse through this page to find the patterns you are looking for. You can download and use them to make your own clothes.


You can also click the Free Sewing Patterns Page at the top of this blog page (under the blog title) to find more free sewing patterns.

Click the below links to browse through all the pattern drafting and sewing tutorials on my blog.


Happy Sewing!

---Flora


Monday, January 16, 2012

Pattern Draft---Empire Waist Dress with Overlapping Front Bodice

In this tutorial, I will show you how to draft the pattern for an empire waist dress with an overlapping bodice at the front, using a shift dress pattern (which has waist darts but no side darts).


Step 1:

Front pattern draft:


I have added a little flare to the basic shift dress pattern, down from the hip.

A to B = Full length
A to C = 1/8 chest + 2.5 inches (or armscye depth)
A to D = Waist length (highest point of shoulder to waist) 
A to E = Hip length (highest point of shoulder to hip) 
A to F = Neck depth (This is as per your wish. I have kept this lesser---1/8 chest minus 0.5 inch---because the neckline will become deeper than this measurement when you draft the overlapping bodices.)
A to J = Neck width (This is usually 1/12 chest + 1/4 inch, but you can change it according to your taste.

Draw horizontal lines from A, F, C, D, E, and B, respectively.

C to G = 1/4 chest + 0.75-inch ease (the ease at the chest line may change according to the stretchiness of the fabric you use, fabric shrinkage after wash, and the fit you like. I wanted to make a semi-fitted dress for my 2-year-old daughter, and the fabric I used was a cotton blend fabric. Therefore, I kept 0.75-inch ease for the dress I made.)

Read this useful article, Understanding Ease in Pattern Drafting by Anna to know more about ease in garment.

A to H = 1/2 shoulder

H to I = 0.50 inch (for girls aged 0 to 14. For women, this could be 1 inch for fitted garments and 3/4 inch for loose or semi-fitted garments). You can change this according to the fit. Measure the shoulder width, that is, the distance between the shoulder point at neck and tip of the shoulder. Use this measure to mark point J from I on the line from A.


Draw a line downward from H that meets the horizontal line from C at point K.

K to L = 1 inch
T = Half of I to L

Mark M 0.5 inch from T. Now shape the front armhole G-L-M-I.

D to N = 1/4 waist + 0.50 inch dart intake (dart intake may vary according to the body type. So please change it as per your requirement. Also, you can add 0.25 to 0.5 inch ease if you don't want a snug fit at the waist.)

E to O = 1/4 hip + 1 inch for kids (1.5 inches for ladies)
B to P = 1/4 hip + 2 inches for kids (3 inches for ladies)


Empire line:

The empire line crosses under the bust. Therefore measure from the high shoulder point to under the bust. (You can also measure 3/4th of CD and use it to mark Q from C.) Draw the empire line QR.

The below picture explains this clearly:


Darts:

Mark waist dart base point S which will be 1/12 chest + 0.5 inch from D. The dart length (upward and downward from D) is usually kept as 1/6 chest. Or you can measure from S up to a point 0.5 to 1 inch below the bust point and use this measure to mark the dart length down from S.

I have kept the dart intake (or dart width) for the basic shift dress as 0.50 inch. (You can increase it according to your requirement. For women, dart intake may vary according to the bust cup size. Also, if a side dart is marked, the waist dart intake will become less. The shift dress pattern for children up to 14 years may not contain a side dart. Check this page to know more about darts. Generally, waist darts are not used for children's sizes up to 6 years and also if the bust round measurement minus waist round measurement is less than 4 inches. I included darts in my daughter's dress as an example to help you understand how darts are split when drafting empire waist dresses. It is not necessary to add darts in younger kids' dresses, but you can add it as a style element if you prefer.)

Step 2:

Now as you have made your basic front pattern, cut through the empire line to separate the bodice piece and the skirt piece.

Step 3:

Make the following changes to the bodice:

On the center front mark point T 1 inch from Q. Connect R and T using a curved line as in the figure below. This will be your new empire waistline.

Extend the dart fold line (that is the center line of the dart) such that it meets the new waistline R-T at point X. Extend the dart legs. Discard the old waistline.


After you have made these changes, the front bodice will look like this:


Step 4:

Unfold the front bodice which will look like this:


Step 5:


Mark point A on the right side neck end of the shoulder. Mark another point B on the waist line (on the left side of the bodice) at the left side dart leg or at a 2- or 3-inch distance from the center front. Connect the points using a curved line as shown in the figure below (drawn in red in the picture below). This will be your new neckline.

You can also draw a straight line instead of a curvy line if you want the neckline less deeper than what is shown here.


Step 6:


Cut the portion of the front bodice shown by the shaded area. This will be the right side of the front bodice.


Add 0.5 inch seam allowance on all the sides, except for the neckline for which you will need to include 0.25 seam allowance if you line it or use bias tape to cover the raw edge. Extend the dart legs as shown in the figure below.


Flip this pattern and use it to cut out the left side of the front bodice. 


Step 7:

Skirt:

Now, let us move on to the skirt portion.

You need to make the following changes to the skirt:

Mark X 1 inch from Q on center front. Connect R and X using a curved line. This will be your new empire waist line on the skirt. Discard the old one.

Mark Y 1 inch from P on the seam. Connect B and Y using a curved line. This will be your new hemline. Discard the old one.

Extend the dart legs upward from the old waistline (N-D) to touch the new empire waistline such that the skirt dart intake matches the bodice dart intake.

These changes are marked in red color in the figure below.


Step 8:

Add 0.5 inch seam allowance to the waist and sides and 1.25 inches for the hemline fold. Extend the dart legs upward.


That's it! We have drafted the front. Tomorrow I will post the steps to draft the pattern for the back of the dress.

Please feel free to post your queries and suggestions in the comment section under this post. I will be happy to read your comments.

I have posted the draft for the back of the dress here.

Sleeve draft is discussed here.  

The sewing tutorial of this dress can be found here.

You can find lots of free PDF printable sewing patterns on this page on my blog. You can download and use them to create your own clothes.

You can also click the Free Sewing Patterns Page at the top of this blog page (under the blog title) to find more free sewing patterns.

Click the below links to browse through all the pattern drafting and sewing tutorials on my blog.


Sunday, December 25, 2011

Merry Christmas

Merry Christmas to all of you my dear friends!

May this day be filled with lots of fun, happiness, togetherness, and sharing.


You can find lots of free PDF printable sewing patterns on this page on my blog. You can download and use them to create your own clothes.

You can also click the Free Sewing Patterns Page at the top of this blog page (under the blog title) to find more free sewing patterns.

Click the below links to browse through all the pattern drafting and sewing tutorials on my blog.


Tuesday, December 20, 2011

Tutorial---How To Make A Simple Reversible Bag


I made a small reversible bag two weeks ago and would like to share the tutorial with you all.

Here is the pattern for it.


A to B = C to D = A to D = B to C = 6 inches. Leave 0.5 inch hem allowance at the top and 0.25 inch seam allowance at the bottom and the sides.


Step 1:

Cut four pieces of fabric using this pattern. Fabric type and color are your choice. I used a dark green silk cotton fabric and a blue-green polycotton fabric. I did a little embroidery on one side of the dark green fabric and I stitched a pink ribbon bow on one side of the blue-green fabric. (Sorry, you won't find it in this picture. I stitched it at a later stage. However, you need it to sew any embellishment or embroidery at this stage.) 

Step 2:

Match the first set of fabric with right sides facing each other, and sew the seams on the sides and the bottom. Leave the top side open.

Step 3:

Cut the corners at the bottom to get that curvy shape when you turn it inside out.


Step 4:

Turn it inside out and you have the first bag.


Step 5:

Repeat steps 2 and 3 for the other set of fabric. The second bag is also ready. Do not turn it inside out.

Step 6:

Fold 0.5 inch for hem at the top of both the bags and pin.


Step 7:

Press the folds with your thumb, remove the pins, and iron the folds into place. Insert the second bag into the first bag with wrong sides facing each other.


Step 7:

Cut three straight pieces measuring 11.5 inches (length) by 1 inch (width) from a matching fabric (I used the blue-green fabric) for straps.

Fold each piece into half and join the raw edges together as shown in the picture below.

Turn them inside out using a safety pin. Sorry. I didn't take a picture of this step.

Now you will have three fabric tubes.


Pin them all together at one end and start braiding them. Once the braid is done secure the other end with another pin.

Step 8:

Repeat step 7 to make the other strap.

Step 9:

Remove each pin from the braided straps and secure the corners of the braid with strong stitches.


Step 10:

Place the straps 1.5 inches from the side seams and sandwich the strap corners between the hemlines at the top of the two bags and sew them in place.

Step 11:

You are done! And here is (are) the finished bag (bags).


Turn it inside out and you have another bag with a completely different style. (You will see the ribbon bow here which I attached before step 7.)

You can make this reversible bag and use it for two different occasions.


I would like to read your valuable comments for this tutorial. Please let me know if any of the step is not clear to you.

You can find lots of free PDF printable sewing patterns on this page on my blog.

You can also click the Free Sewing Patterns Page at the top of this blog page (under the blog title) to find more free sewing patterns.

Click the below links to browse through all the pattern drafting and sewing tutorials on my blog.


Housewarming Gifts