Search This Blog

Translate

Wednesday, June 4, 2025

Free Printable PDF Sewing Patterns for Women – Tops, Pants, and More


Looking for free PDF sewing patterns you can download and start using today? Whether you’re a beginner or a seasoned sewist, I’ve gathered all the printable sewing patterns I’ve created right here — from vests and tops to pants and shorts.


Tops:

1. Women's Tie-Front Top---A flattering top with front-tie detail; great for woven fabrics


3. Women's Side Tie Ruffle Hem Top---Adds a feminine ruffle touch; works best with light cottons


4. Women's Tie-Front Peplum Top---Peplum hem flatters the waist; try with rayon or voile


5. Women's Simple Top---Size M---A basic top ideal for casual wear and layering


6. Women's Reversible Wrap Top or Vest with Tie Strings---Two looks in one; perfect for layering


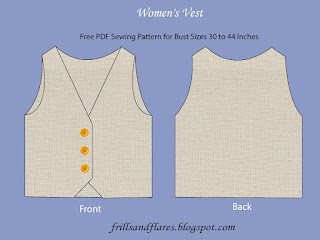
Vests


Bottoms:


2. Women's Shorts with Elasticated Waist---Quick sew project; perfect for summer lounging


Kurta/Kameez

1. Women's Kurta (or Kameez) for Bust Sizes 30 to 44 Inches---Classic, versatile piece with a modest fit


2. Women's Kurta (or Kameez)---Size XS (Bust Size 30 Inches)---Ideal for petite sewists or teens; simple and chic


Monday, June 2, 2025

Women's Side Tie Ruffle Hem Top---Sewing Tutorial + Free PDF Sewing Pattern for Bust Sizes 30 to 44


Here's another free PDF sewing pattern for women. This is a pattern for side tie top for women's bust sizes 30, 32, 34, 36, 38, 40, 42, and 44 (that is, sizes XS to XXL).

This sleeveless top has a fun ruffle hem and cute side ties you can adjust for an easy, flattering fit. 

Just toss it over a long top, shirt, or dress like a vest, and you've got an easy, cool vibe that takes your outfit to the next level.   


Click the link below to browse all the free PDF sewing patterns for women:


Click the link below to browse all the free PDF sewing patterns for kids:


Click the link below to see the complete list of Free PDF Sewing Patterns for 18-Inch Dolls:


This is the measurement chart I used to create this pattern. Please select the pattern size according to your bust size. 


Seam allowances:

Seam allowances are included in the pattern.

Top's bodice part:

1/2 inch for the neck line and armhole

1/2 inch for the sides

1/2 inch at the hemline

Ruffle:

Top edge: 1/2 inch
Sides: 1/2 inch
Bottom edge: 3/4 inch


Download link:


How to Print and Assemble the PDF Pattern Pages:


How to Sew?

1. With right sides facing join the front and back bodices at the shoulders.

2. Finish the armhole with bias tape

3. Finish the sides. Start pinning a long bias tape to both sides of the top. While pinning it, sandwich fabric ties under the bias tape on each side and sew. Fold the bias tape to the wrong side and sew. 

4. Fold the sides and bottom edge of the ruffle strip. Then, gather the top edge of the ruffle strip and attach it to the hemline of the top. Serge the raw edges, or use a bias tape to cover it.

5. Finish the neckline by attaching bias tape.


Done!


Please check the link below to get some idea on how to attach the bias strips to the sides of the top, as well as the fabric ties. 


You can completely hide the bias tape under, or you can use a contrast fabric as shown in the baby dress sewing tutorial.

You can attach the fabric ties in different ways you prefer. You can sandwich the fabric ties under the bias tape, and then fold down the bias tape; attach them after you have folded down and sewn the bias tape; or attach them on the outside over the bias tape. The design choice is up to you!


Click on the link Free Sewing Patterns Page at the top of this blog page (under the blog title) to find more free sewing patterns.

Click the links below to browse through all the pattern drafting and sewing tutorials on my blog.


Happy sewing!

---Flora


Friday, May 30, 2025

Women's Side Tie Top---Sewing Tutorial + Free Sewing Pattern (for Bust Sizes 30 to 44)


Here's another free PDF sewing pattern for women. This is a pattern for side tie top for women's bust sizes 30, 32, 34, 36, 38, 40, 42, and 44 (that is, sizes XS to XXL).

This sleeveless top features stylish side tie strings that can be fastened for an effortlessly cute and flattering look. 

Layer it over a long top, shirt, or dress like a vest to instantly elevate your look with a chic, versatile touch.    


Click the link below to browse all the free PDF sewing patterns for women:


Click the link below to browse all the free PDF sewing patterns for kids:


Click the link below to see the complete list of Free PDF Sewing Patterns for 18-Inch Dolls:


This is the measurement chart I used to create this pattern. Please select your pattern size according to your bust size. 


Seam allowances:

Seam allowances are included in the pattern.

Top's bodice part:

1/2 inch for the neck line and armhole

1/2 inch for the sides

3/4 inch at the hemline


Download link:


How to Print and Assemble the PDF Pattern Pages:


You can use the following diagram as a guide to assemble the pattern:


Supplies Needed:

1. Fabric

2. Measuring tape

3. Matching thread

4. Sewing machine

5. Scissors

6. Sewing pins

7. Fabric marker or pencil

8. Serger (optional)


How to Sew?

1. With right sides facing join the front and back bodices at the shoulders.

2. Finish the armhole with bias tape

3. Finish the sides. Start pinning a long bias tape to both sides of the top. While pinning it, sandwich fabric ties under the bias tape on each side and sew. Fold the bias tape to the wrong side and sew. 

4. Sew the hemline of the top.

5. Finish the neckline by attaching bias tape.


Done!


If you want a pattern for a side tie top with ruffle hem, click the link below:

Women's side tie ruffle hem top


Please check the link below to get some idea on how to attach the bias strips to the sides of the top, as well as the fabric ties. 


You can completely hide the bias tape under, or you can use a contrast fabric as shown in the baby dress sewing tutorial.

You can attach the fabric ties in different ways you prefer. You can sandwich the fabric ties under the bias tape, and then fold down the bias tape; attach them after you have folded down and sewn the bias tape; or attach them on the outside over the bias tape. The design choice is up to you!


I will soon post a step-by-step picture tutorial. 


Click on the link Free Sewing Patterns Page at the top of this blog page (under the blog title) to find more free sewing patterns.

Click the links below to browse through all the pattern drafting and sewing tutorials on my blog.


Happy sewing!

---Flora


Thursday, May 29, 2025

Women's Tie-Front Top---Sewing Tutorial + Free Sewing Pattern (for Bust Sizes 30 to 44)


Here's another free PDF sewing pattern for women. This is a pattern for tie front gathered top for women's bust sizes 30, 32, 34, 36, 38, 40, 42, and 44 (that is, sizes XS to XXL).

You can make this top either sleeveless or with sleeves.

The sleeves provided in the pattern are puff sleeves with fullness at the sleeve cap and at the hemline. Sleeve length is up to the elbow. 


Click the link below to browse all the free PDF sewing patterns for women:


Click the link below to browse all the free PDF sewing patterns for kids:


Click the link below to see the complete list of Free PDF Sewing Patterns for 18-Inch Dolls:


This is the measurement chart I used to create this pattern. Please select your pattern size according to your bust size. 


Seam allowances:

Seam allowances are included in the pattern.

Top's bodice part:

1/2 inch for the neck line, armhole, and the center front

1 inch for the sides

Sleeve:

1/2 inch for the sleeve cap

1 inch for the sides

3/4 inch at the hemline


Download link:


How to Print and Assemble the PDF Pattern Pages:


Supplies Needed:

1. Fabric

2. Measuring tape

3. Matching thread

4. Elastic (1-inch wide; length = waist circumference minus 1 inch)

5. Sewing machine

6. Scissors

7. Safety pin

8. Sewing pins

9. Fabric marker or pencil

10. Serger (optional)

How to Self-Draft This Pattern?

If you want to draft this pattern yourself for your body measurements, check out this link for the detailed drafting tutorial.


How to Sew?

1. With right sides facing join the front and back bodices at the shoulders.

2. Attach the sleeves. (For a sleeveless top, join the sides of the top and finish the armhole with bias tape, and skip steps 3 and 4.)

3. Join the sides of the sleeves and the top.

4. Sew the hemline of the sleeves and the top.

5. Finish the neckline by attaching bias tape.

6. Finish the center front. Start pinning a long bias tape to both sides of the the center front. While pinning it, sandwich six fabric ties under the bias tape, three on each side and sew. Turn the bias tape to the wrong side and sew. 

Done!


After creating this pattern, I later realized how it matched with the baby dress I posted on my blog 14 years before. 😊

Please check the link below to get some idea on how to attach the bias strips to the blouse's neckline and center front, as well as the fabric ties. 


You can completely hide the bias tape under, or you can use a contrast fabric as shown in the baby dress sewing tutorial.

You can attach the fabric ties in different ways you prefer. You can sandwich the fabric ties under the bias tape, and then fold down the bias tape; attach them after you have folded down and sewn the bias tape; or attach them on the outside over the bias tape. The design choice is up to you!


I will soon post a step-by-step picture tutorial. 

Here's the 18-inch doll version of the top:


Click on the link Free Sewing Patterns Page at the top of this blog page (under the blog title) to find more free sewing patterns.

Click the links below to browse through all the pattern drafting and sewing tutorials on my blog.


Happy sewing!

---Flora


Wednesday, April 23, 2025

Kids' Japanese-Style Reversible Cross-Back Apron---Free PDF Sewing Pattern and Sewing Tutorial


I have designed this reversible Japanese-style apron  specifically for kids---sizes 1 year to 12 years. It features overlapping back pieces that criss-cross at the center, creating a stylish and functional design.

The apron is designed to slip easily over your kid's head, so the front neckline has been lowered to accommodate the head circumference. Additionally, the criss-cross back pieces can be widened to ensure a comfortable fit while allowing flexibility when putting the apron on.

As it is reversible, your kid will have two aprons in one.

You can use two contrasting fabrics for the outer and inner sides of the apron to highlight its reversible design.

You can chop a few inches off the hemline to change the apron into a summer top.


Click the link below to browse all the free PDF sewing patterns for women:


Click the link below to browse all the free PDF sewing patterns for kids:


Click the link below to see the complete list of Free PDF Sewing Patterns for 18-Inch Dolls:


I have provided the link to the free pattern below.


Size Chart:

This is the size chart I used. Please take your kid's bust round measurement and compare it with the measurement in the size chart to find the right size for her.


Check out my free 18-inch doll cloth PDF sewing patterns and tutorials:

Click this link for a complete list of 18-Inch Doll Clothes Free PDF Sewing Patterns and Sewing Tutorials


Let's jump in to the tutorial.

Materials Needed:

  • Fabric (cotton, lightweight linen, or knit)
  • Matching thread
  • Scissors
  • Pins or clips
  • Sewing machine (or hand-sewing needle)
  • Measuring tape
  • Iron

Steps to Sew Kids' Reversible Cross-Back Apron:

1. Download the Free PDF Pattern:


Pattern download link:


*This pattern is for non-commercial use only.

How to print and assemble the pattern pages?


Click here to learn how to print and assemble the PDF pattern pages. 


There are 12 pages in the pattern to print and assemble.

Use the below diagram as a guide to assemble the pattern pages:


Seam and Hem Allowances 


Seam and hem allowances are included in the pattern.

For both the outer fabric (that is, fabric 1) and the inner fabric (that is, fabric 2):

1/2 inch all around

For the pocket:

3/8 inch all around


2. Cut the Fabric

  • Cut one piece on fold from fabric 1.
  • Cut one piece on fold from fabric 2.

3. Sew the Pocket
  • With right sides facing, join the two pocket pieces with a 3/8 inch seam allowance, leaving a small gap on any of the sides to turn it inside out.
  • Pin the pocket to the apron and top stitch all around, making sure to close the gap you left for the turn-over.

4. Finish the neckline, armhole curve, and the cross-back curve

  • With right sides facing, place fabric 2 over fabric 1, and sew the neckline, armhole, and cross-back curve of fabric 1 and fabric 1, with a 1/2 inch seam allowance, as shown in the image below. Leave the shoulder seams and the hemline open.


5. Join the shoulders

  • Turn the apron inside out.
  • Grab one side of the back shoulders and place it over the opposite front shoulder. Now, slide your fingers through the hemline opening and bring the back shoulder through the front shoulder opening, and turn it over to the wrong side. Match the side seams  and sew around. This won't be possible to sew with a sewing machine. So you need to hand stitch them together.
  • Repeat this step for the other shoulder seams as well.

6. Hem the Bottom Edge

  • Close the hemline opening using machine stitch or hand stitch.
7. Press the apron for a neat finish

Final Touches

  • Trim any loose threads.
  • Sew along all the edges (optional)


Now your daughter has a cute reversible Japanese-style cross-back apron! 


Check out the free sewing pattern for the 18-inch doll version here.


I have posted lots of free PDF printable sewing patterns on this page on my blog. Browse through this page to find the patterns you are looking for. You can download and use them to make your own clothes.


You can also click the Free Sewing Patterns Page at the top of this blog page (under the blog title) to find more free sewing patterns.

Click the links below to browse through all the pattern drafting and sewing tutorials on my blog.


Happy Sewing

---Flora